


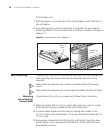

28 CHAPTER 2: INSTALLING THE SWITCH
For further information about Power Over Ethernet, refer to “Power
Management and Control” in the Switch Implementation Guide supplied
on the CD-ROM that accompanies your Switch. Power over Ethernet
management is available using the web interface or the command line
interface (CLI).
Choosing the Correct
RJ-45 Cables
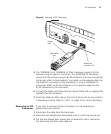
All of the RJ-45 ports on the Switch are Auto-MDIX, that is they have a
cross-over capability. The port can automatically detect whether it needs
to operate in MDI or MDIX mode. Therefore you can make a connection
to a port with a straight-through (MDI) or a cross-over cable (MDIX).
The Auto-MDIX feature only operates when auto-negotiation is enabled.
If auto-negotiation is disabled, all the Switch ports are configured as
MDIX (cross-over). If you want to make a connection to another MDIX
port, you need a cross-over cable. Many ports on workstations and
servers are configured as MDI (straight-through). If you want to make a
connection to an MDI port, you need to use a standard straight-through
cable. See Table 7.
WARNING: The Switch supports Power over Ethernet on rear ports 1, 2,
5 and 6. These ports should only be used for Ethernet wiring within the
same building. The SFP and 100BASE-FX ports of the Switch 9 FX can be
used for Ethernet wiring between buildings.
3Com recommends that you use Category 5e twisted pair cable — the
maximum segment length for this type of cable is 100 m (328 ft).
Table 7 Cables required to connect the Switch to other devices if
auto-negotiation is disabled
CAUTION: If you want to install the Switch using a Category 5e or
Category 6 cable, 3Com recommends that you briefly connect the cable
Cross-over Cable Straight-through Cable
Switch to Switch
(MDIX to MDIX)
✓
✕
Switch to Hub
(MDIX to MDIX)
✓
✕
Switch to PC (NIC)
(MDIX to MDI)
✕
✓