


User Manual
PSE2500-A3 External PoE
Power System
Chapter 4
Installation and
Debugging
4-1
Chapter 4 Installation and Debugging
4.1 Introduction
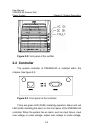
This section outlines the sequence for installing the PSE2500-A3
device, including plug-in modules, as well as test procedures for
verifying the integrity of the installation.
4.1.1 Guidelines
The device may be installed to allow rear and front access. All
cables may be routed through conduit openings, and all the operation
can be completed on the front side.
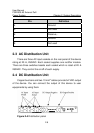
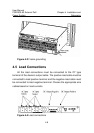
4.1.2 EMI Considerations
When running the dc output cables, pair the positive and negative
conductors over as much of their length as possible to minimize loop
areas.
4.1.3 Installation Tools and Hardware
You will need the following tools and hardware to install and test
the PSE2500-A3 unit:
z Wire cutters and strippers
z Heat shrink gun and appropriately sized heat-shrink tubing
z Electric screwdriver with 6 mm (0.24 in.) hex head with
variable torque range, 0 to 120 in lbs (0 to 13.6 N.m)
z Adjustable wrench
z M8 sleeve