


Installation Requirements and Recommendations 29
Installation Hardware
and Tools
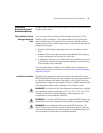
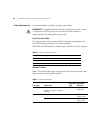
Table 10 lists the mounting hardware and tools required for each type of
installation.
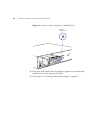
WARNING: To reduce the risk of equipment damage, make sure the WX
switch is installed so that the mechanical load on the device is evenly
distributed. For example, make sure the switch is level in the equipment
rack, is evenly fastened by screws on either side, and does not have a
heavy object resting on one side of the switch.
Table 10 Required Mounting Hardware and Tools
Mounting Option Required Hardware and Tools
Included with
the Product
Equipment rack
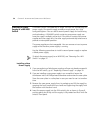
Front-mount or
center-mount option for
the WX4400 switch
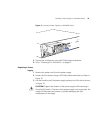
Front-mount option for
the WX1200 and
WX2200 switch
Mounting brackets Yes
Four rack-mount screws and
screwdriver
Note: Equipment racks vary, and
the screw and screwdriver type
depend on the equipment rack.
No
Power cords Yes (one)
Serial console cable Yes
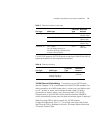
Tabletop (applicable to all
switch models)
Four adhesive rubber feet Yes
Power cord(s) Yes
Serial console cable Yes