


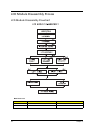


Chapter 3 83
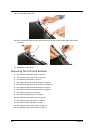
Removing the LCD Brackets
1. See “Removing the Battery Pack” on page 49.
2. See “Removing the Lower Cover” on page 50.
3. See “Removing the DIMM” on page 51.
4. See “Removing the WLAN Board Module” on page 52.
5. See “Removing the Hard Disk Drive Module” on page 53.
6. See “Removing the Optical Drive Module” on page 54.
7. See “Removing the CPU Heatsink Module” on page 57.
8. See “Removing the CPU” on page 58.
9. See “Removing the Keyboard” on page 59.
10. See “Removing the Middle Cover” on page 60.
11. See “Removing the LCD Module” on page 61.
12. See “Removing the LCD Bezel” on page 77.
13. See “Removing the Camera Board” on page 78.
14. See “Removing the Inverter Board” on page 79.
15. See “Removing the LCD with Brackets” on page 80.
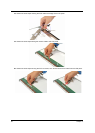
16. Remove the four screws (H) securing the left and right LCD brackets to remove the brackets.
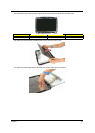
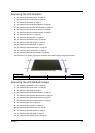
Removing the LCD Module Hinges
1. See “Removing the Battery Pack” on page 49.
2. See “Removing the Lower Cover” on page 50.
3. See “Removing the DIMM” on page 51.
4. See “Removing the WLAN Board Module” on page 52.
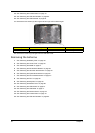
5. See “Removing the Hard Disk Drive Module” on page 53.
6. See “Removing the Optical Drive Module” on page 54.
7. See “Removing the CPU Heatsink Module” on page 57.
8. See “Removing the CPU” on page 58.
9. See “Removing the Keyboard” on page 59.
10. See “Removing the Middle Cover” on page 60.
11. See “Removing the LCD Module” on page 61.
12. See “Removing the LCD Bezel” on page 77.
13. See “Removing the Camera Board” on page 78.
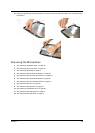
Step Size (Quantity) Color Torque
1~4 M2 x L3 (4) Silver 1.6 kgf-cm