


X1161/X1261/X1161A/X1161N/X110/H5360 Condential
2-1
Chapter 2
Disassembly & Assembly Process
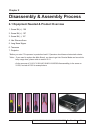
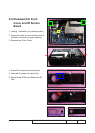
2-1 Equipment Needed & Product Overview
1. Screw Bit (+): 105
2. Screw Bit (+): 107
3. Screw Bit (-): 107
4. Hex Sleeves 5mm
5. Long Nose Nipper
6. Tweezers
7. Projector
* Before you start: This process is protective level II. Operators should wear electrostatic chains.
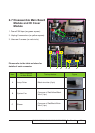
* Note: - If you need to replace the Main Board, you have to get into Service Mode and record the
lamp usage hour, please refer to section 2-21.
- As the process of X1161/ X1161A/X1161N/X110/H5360 disassembling is the same as
X1261, we take X1261 for example here.