


Installation and Startup 700-701-100-02
24 August 9, 2002 UTU-701 and ETU-751 List 1
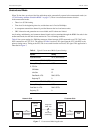
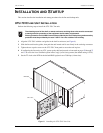
ETU-751C DESKTOP UNIT INSTALLATION
Perform the following steps to install an ETU-751C desktop unit.
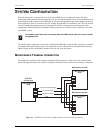
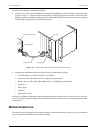
1 Insert the AC power cord into the power cord receptacle on the ETU rear panel.
2 Plug the power cord into a source of 100 V to 240 V, 50 or 60 Hz AC power.
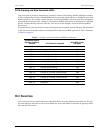
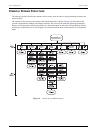
3 If configuring the desktop unit as an LTU, power up the shelf and proceed as instructed on pages 25 through
27 and 37 to access the Local Unit Role option in the Config System Settings menu (the default setting is
NTU).
4 Connect the DTE cables to the 120 or 75 Ω connectors on the ETU-751C rear panel.
5 Connect the HDSL line cable to the HDSL line connector on the ETU rear panel.
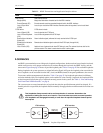
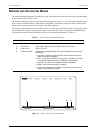
HDSL STARTUP AND SYNCHRONIZATION
The rate selectable LTU holds the configuration settings for the rate selectable NTU. At startup, the LTU first
confirms that the NTU is a rate selectable unit. The LTU then configures the NTU with the required settings.
Power up the rate selectable units and observe the synchronization process as follows:
1 Power up the shelf or enclosure where the units are installed.
2 Confirm the following:
• The HDSL ALM LED is on and the HDSL SYNC LED flashes once per second as the units
self-configure and establish synchronization.
• After approximately 60 seconds the HDSL ALM LED is off and the HDSL SYNC LED is steady green.
The units are now ready for configuration through the console screen menus.
The line and desktop units will reset and their LEDs will sequence through the startup cycle
following any change to the Local Unit Role option. If necessary, log on again by pressing the
several times.
If the HDSL SYNC LED continues to flash after 90 seconds, the HDSL line is faulty or one of the
units is not a rate selectable unit. Check for the correct line units. Test the HDSL line using the
loopbacks described in “Testing” on page 60. Front panel loopback (LPBK) LED indications are
described in Table 4 on page 6.
The LTU and NTU will reset and their LEDs will cycle through the startup sequence following
any change to the HDSL Payload Rate option (see “Configure System Settings” on page 37).
SPACEBAR