


SmartView XPro Installation and Use Page 26
3. Configuring the SmartView XPro
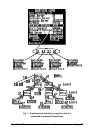
3.1 Configuration summary
The SmartView is configured using the on-screen menu system which is activated
by default when you first power on the system. It may also be accessed by using the
keyboard 'hotkeys' (see section 4.8) or by using the SmartView's front panel keys
(see section 4.6). The following steps summarise a typical configuration process. For
more advanced information on each of the configuration steps please refer to the
appropriate sections of this manual shown in brackets.
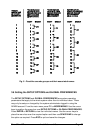
Note: The SmartView is configured via the ADMIN user account. The SmartView will
allow multiple users to be logged in under the ADMIN account but will only allow one
of these users to be adding or editing computer names or user profiles or setting
global and setup options at any one time.
Step 1 - Decide if you are going to use password security
The SmartView may be run with security enabled or disabled. With security disabled,
all user ports have full access to all of the computers and full administration rights.
The SmartView is shipped to you with security disabled. This mode is suitable for
more simple installations with a small number of users. Larger installations or
systems with larger numbers of users will require password security to be enabled.
In this mode, each user logs on to the system and is allocated access rights to
defined computers by the system administrator. This mode is recommended for
most systems (see section 3.2 for details on how to enable security). If you are not
using security the go to step 4.
Step 2 - Create an ADMIN (administration) account password
The SmartView has a fixed user account that cannot be deleted named ADMIN. This
user account is the only one that is able to make important system changes. If you
are going to be using security then you should allocate a password to this account
(see section 3.3 for instructions).