


Installation
61181012L1-5C 9
Bay Framework-Mount Instructions
To mount the 10Base-T Hub to the bay framework, complete the following steps:
NOTE
The 10Base-T Hub ships pre-assembled to the external mounting
bracket, and unassembled from the internal mounting bracket.
The 10Base-T Hub must be disassembled before performing the
following instructions. See
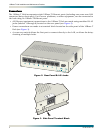
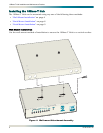
Figure 3 and Figure 4 for details on dis-
assembling and assembling the 10Base-T Hub.
1. Remove the hub from the external mounting bracket by removing the flathead screw near
the power connector that secures the hub to the bracket. Slide the hub away from the tab
and lift off the bracket (see
Figure 4).
2. The external mounting bracket, removed from the 10Base-T Hub in step 1, will not be
used in this application. The internal mounting bracket, shipped unassembled from the
10Base-T Hub, will be used instead.
3. Mount the internal bracket through the flange to anywhere on the bay framework.
4. Attach the 10Base-T Hub to the mounting bracket via the keyholes on the bottom of the
10Base-T Hub. The front panel of the 10Base-T Hub must be facing the side flange.
5. Use the flush mount phillips-head screw to secure the 10Base-T Hub to the bracket
through the small lip on the side of the bracket. The orientation is correct if the lip is flush
against the 10Base-T Hub on the side containing the power connection terminal block.
6. Put the 10Base-T Hub on the bay framework-mount bracket.
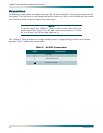
7. Connect the RJ-45 cables. For more information, refer to the “Connections” on page 10 in
this practice.
Desk-Mount Installation
To mount the 10Base-T Hub to a desk, complete the following steps:
1. Remove the 10Base-T Hub from the bracket, as it will not be used in this application.
2. Attach the rubber desk mounts to the bottom of the 10Base-T Hub.
3. Plug in cables and set the unit on a flat surface. Allow adequate slack in the RJ-45 cables.
For more information, refer to the “Connections” on page 10 in this practice.