


2-4
Operating the Instrument
Exercise 1. Installing a Plug-in Module
Exercise 1. Installing a Plug-in Module
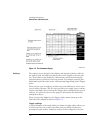
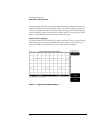
The purpose of a plug-in module is to provide measurement channels, includ-
ing sampling for the mainframe. A plug-in module scales the input signal, sets
the bandwidth of the system, and allows the offset to be adjusted so the signal
can be viewed. The output of the plug-in module is an analog signal that is
applied to the A/D converters inside the mainframe.
1
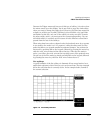
Slide the plug-in module into either slots 1 and 2
or
slots 3 and 4.
If the mainframe is already turned on, you do not need to turn it off before you
install or remove a plug-in module. After a plug-in module is installed, the
mainframe identifies the plug-in module and the slot in which it is installed.
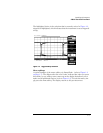
2
Finger-tighten the knurled screw at the bottom of the plug-in module.
The RF connectors on the rear panel of the plug-in module are spring-loaded.
Finger-tighten the knurled screw to ensure there is a good ground connection
between the plug-in module and the mainframe.
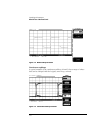
3
To remove the module loosen the knurled screws and then pull on the screws
to take out the module. Do
not
pull on the cables or connectors.
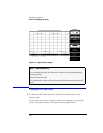
Note
The plug-in module will
not
operate if plugged into slots 2 and 3.
Note
In the examples to follow, it is assumed the Agilent 83483A or Agilent 54751A plug-in
module is resident in slots 1 and 2 of the mainframe.