


8 Rapier Series Switch
C613-04017-01 REV H
Configuring the Switch
Some configuration is necessary if you wish to enable the switch’s advanced
switching capabilities. The switch can be configured by using the Command
Line Interface (CLI) or Graphical User Interface (GUI).
Using the CLI to configure a switch
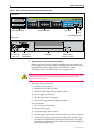
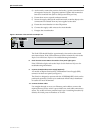
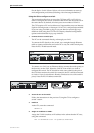
1. Connect a terminal or PC to the Terminal Port (ASYN0)
Using the supplied RS-232 DB9 straight-through cable, connect a VT100-
compatible terminal or the COM port of a PC running a terminal
emulation program such as Windows Terminal, to the RS-232 Terminal
Port on the switch’s front panel.
2. Set the communication parameters
Set the communication parameters on your terminal or terminal emulation
program to:
• Baud rate: 9600
• Data bits: 8
•Parity: None
• Stop bits: 1
• Flow control: Hardware
3. Log in and set the password
After the switch has booted, the log-in prompt appears. If the log-in
prompt doesn’t appear, press [Enter] two or three times.
When the switch boots for the first time it automatically creates an account
with manager privileges. The account has the log in name “manager” and
the password is “friend”.
At the log in prompt, enter the log in name and password.
Login: manager
Password: friend
The switch’s command prompt appears and you can now configure the
switch using the command line interface.
Change the password as soon as possible. Leaving the manager account with
the default password is a serious security risk. Make sure you remember the
new password as there is no way to retrieve it if it is lost.
Use the following command to change the account password:
set password
The Command Help lists available commands for each protocol, and their
syntax. To display a list of help topics, enter:
help
To display help on a specific topic, enter:
help topic
Alternatively, type a question mark (?) at the end of a partially completed
command to see a list of valid options.