


Quick Install Guide 9
C613-04017-01 REV H
See the Rapier Switch Software Reference for more information on start-up
and configuration procedures (including a list of message definitions).
Using the GUI to configure a switch
This section describes how to access the GUI from a PC via VLAN1, in
order to configure the switch. It assumes that the PC and the switch are in
the same subnet. By default, all switch ports are members of VLAN1.
The GUI requires a PC and web browser. Supported browsers are Internet
Explorer 5.0 and greater, or Netscape 6.2.2 or 6.2.3, with JavaScript enabled.
If you are using a toolbar or plug-in on your browser to block pop-ups,
disable it while using the GUI. The GUI displays detailed configuration
options and information in pop-up windows.
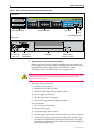
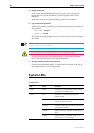
1. Connect the PC to a switch port.
The PC can be connected directly, or through your LAN.
To connect the PC directly to the switch, use a straight-through Ethernet
cable to connect an Ethernet card on the PC to any one of the switch ports.
Note the PC’s IP address and mask.
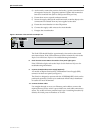
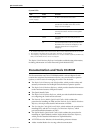
To connect via a LAN, use an Ethernet cable to connect the switch port(s) to
the device(s) on the LAN. Select the LAN PC from which you wish to
configure the switch. The PC should be in the same subnet as the part of
the LAN that contains the switch (for example, the PC could be connected
to a hub or Layer 2 switch that is directly connected to one of the switch’s
ports). Note the PC’s IP address and mask.
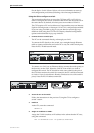
2. Access the CLI on the switch.
Follow the instructions in the previous "Using the CLI to configure a
switch" section.
3. Enable IP.
At the CLI, enter the command:
ENABLE IP
4. Assign an IP address to VLAN1.
Assign the VLAN1 interface an IP address in the subnet that the PC uses,
using the command:
ADD IP INTERFACE=vlan1 IP=ipaddress MASK=mask
Rapier
switch ports
PC
hub or layer 2 switch
PC
switch ports
Rapier