


AR700 Series Router
6
Before installing
■ Read the safety information “Safety” on page 20.
■ Gather the tools and equipment you will need.
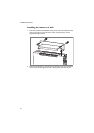
To install an AR750S or AR770S in a rack (Installing the router in a rack)
you will need:
• the rack mount bracket kit included with your router
• a Phillips #1 screwdriver
• screws and cage nuts to attach the brackets to your rack.
To install an AR750S on a wall (Installing the router on a wall) you will need:
• the wall mount bracket kit supplied with the router.
• a Phillips #1 screwdriver and a Phillips #2 screwdriver.
• If you are fixing the router to a solid masonry or hollow wall, you need
equipment to drill a 6
mm hole.
You may also need:
• an optional Port Interface Card (PIC) and the PIC Installation and Safety
Guide.
• an optional SFP (Small Form-factor Pluggable module). See the AR700
Series Router Hardware Reference for a list of approved SFPs; order from
your authorised Allied Telesis distributor or reseller. (Installing SFPs)
■ Unpack the router. Verify the package contents. If any items are damaged or
missing, contact your sales representative.
■ Place the router in its operating location. See the previous section “Selecting
a site” on page 5 for guidelines on choosing a suitable location.
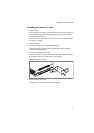
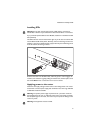
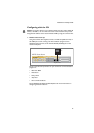
Installing PICs
If you purchased optional Port Interface Cards (PICs), install them by following
their Installation and Safety Guide. That guide can be found with the PIC, on the
Documentation and Tools CD-ROM, or can be downloaded from
www.alliedtelesis.com/support/documentation/