


4 AT-9800 Series Switch
C613-04043-01 REV D
Selecting a Site
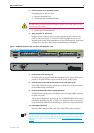
The switch can be installed in a standard 19-inch rack or on a level surface such
as a desktop or bench. When installing the switch, choose a site that:
■ Allows adequate airflow around the switch and its vents.
■ Is free of dust and moisture.
■ Will maintain an ambient temperature range of 0-50º C (32-122º F) and a
humidity range of 5-95% non-condensing.
■ Has a reliable and earthed (grounded) power supply circuit, preferably
dedicated and filtered.
■ Does not expose cabling to sources of electrical noise, such as radio
transmitters, broadband amplifiers, power lines, electric motors, and
fluorescent fixtures.
■ Allows easy access to the switch’s power and cable connections.
■ Will allow all related network devices to be connected to the switch
without exceeding maximum cable length limitations. See the AT-8800
Series Hardware Reference for cable length specifications.
Installing the Switch
This equipment must be earthed.
Follow these steps to install the switch:
1. Read the safety information
For safety information, see the Safety and Statutory Information booklet. A
copy of this booklet is supplied with each switch, and can also be found on
the Documentation and Tools CD-ROM or at www.alliedtelesis.com/support/
software.
2. Gather the tools and equipment you will need
If the switch is to be connected to a redundant power supply, you will need
a redundant power supply unit and cable (see step 8).
To install the switch in a rack you will need screws and cage nuts to attach
the brackets to your rack. These are supplied with the switch.
3. Choose a suitable site for the switch
Either a flat surface or 19 inch rack.
4. Unpack the switch
Verify the package contents. If any items are damaged or missing, contact
your sales representative.