


2
Thank you for purchasing this Altec Lansing product. For generations,
Altec Lansing has been first in audio innovation. Today, our line of
powered speakers has received more performance awards than any
other brand. In all kinds of desktop environments, in every price range,
Altec Lansing offers sound of distinction — giving even the most
demanding customers the audio enjoyment they seek. Just listen to this!
Box Contents
• Two speakers
• Universal power supply with international plug set
• USB cable
• 3.5 mm stereo cable
• Deluxe carry case
• User’s guide
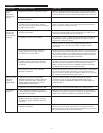
Setting-up Your Speakers
• Unfold the stand by pressing on the metallic bar located on the
front of each speaker. The stand will automatically pivot 270
degrees. Note: To close the stand, gently rotate it back to the closed
position until it locks into place.
• Locate the retractable speaker-to-speaker cable on the rear of the
left speaker, and pull it gently to connect it to the rear of the right
speaker.
Caution: To prevent full speed speaker cable return, press the button
near the cable and hold the cable when rewinding.
Placing Your Speakers
Arrange the speakers to suit your listening tastes — from right next to
the laptop computer to as far apart as the speaker cords allow.
For optimum sound, speakers should be placed in a left/right
configuration, preferably apart and at equal distance from the center
of the listening area. This will offer the best stereo imaging and
provide the most satisfying results.
Note: The speakers ARE magnetically shielded and can be placed close
to video displays such as computer monitors and TVs without distorting
the image.
Powering Your Speakers
There are two different ways to provide your speakers with the
required electrical power.
• Use your laptop to power your speakers: Locate the USB cable and
connect the smaller connector (USB Mini B) to the back of the right
speaker, and the larger connector (USB A) to the USB port on the PC
computer, Mac computer, or USB hub. The USB connection will
provide both the power and the audio signal to the speaker system.
Warning: If you are using your laptop to power your speakers, make
sure the laptop is turned on and is not in sleep-mode.
•OR use a wall outlet to power your speakers: Insert the barrel
connector from the universal power supply into the DC connector on
the side of the XT2 system. After this connection is made, insert the
power supply into a wall outlet.
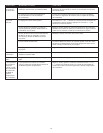
Making Connections
Various connection schemes between your audio source and the
speaker system are available. Determine if you’ll be setting up the
speaker system for laptop computer or PC, portable audio device, or
console gaming, then skip to the appropriate section. To ensure first-
time operation as expected, please carefully follow the connection
sequences described below in the order indicated.
Note: Turn off the audio source (i.e., your laptop, PC, MP3 player, Sony
PlayStation, etc.) before connecting it to the speaker system.
Laptop Computer or PC
Installation instructions vary depending on your computer’s operating
system. Determine which operating system is installed on your computer
and skip to the appropriate section. Once the installation is completed
you will be able to control the system using the computer operating
system’s audio controls or the XT2’s controls on the right speaker.
Note: Your operating system’s installation CD may be required to
complete the installation.
Mac OSX:
• XT2 installation will start automatically once USB cable connections
are made.
Windows XP:
• XT2 installation will start automatically once USB cable connections
are made.
Windows 98SE:
• Follow the on-screen prompts to complete the installation.
• Note: When using Windows 98SE you will need to use software
which supports “Digital Audio Extraction” such as Microsoft
Windows Media Player 7 or higher. Your CD Drive will also need to
support “Digital Audio Extraction.” Otherwise you will not be able
to hear CD audio.
Windows 2000/Windows Millennium Edition (ME):
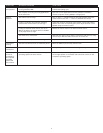
1. Start the “Device Manager” (Consult your operating system’s online
help for information on accessing “Device Manager.”)
2. Click the “+” sign to the left of the “DVD/CD-ROM drive(s)” item in
the list.
3. Right-click on the “DVD/CD-ROM drive(s)” device for which you wish
to enable the “Digital Audio Extraction” feature, and select the
“Properties” menu item.
4. Select the “Properties” tab from the “Properties” sheet.
5. Check the “Enable digital CD audio for this CD-ROM device” box. If
the checkbox is disabled, your drive does not support this feature
and you will not be able to listen to CD Audio with the XT2.
Note: You may need to restart you computer for this change to
take effect.
Portable Audio Device (MP3, Portable CD Players,
Portable DVD Players, etc.)
• Locate the 3.5mm stereo cable and connect one end to the auxiliary
input (AUX) on the side of the right speaker, and the other end to
the “line-out,” “audio-out,” or headphone jack on your portable
audio device.
Warning: If you would like to connect an alternate audio source via
the auxiliary input (AUX) — such as a CD player or MP3 player — while
the XT2 is connected to a laptop via the USB port, you must first set
the “Mic in/Wave in” input slider on your laptop to its minimum
position (Please note that this will disable the XT2’s microphone
feature.) Please refer to the “Disabling the Mic in/Wave in Input Slider”
section for details.
Console Gaming
Note: Connection to a console game system requires the use of the
Console Gaming Y-Adapter, which is not included. This adapter can be
purchased at www.alteclansing.com.
Most console game systems feature dual-RCA outputs. To connect your
speakers, follow the steps below:
1. Make sure the power to your console gaming system is turned off.
2. The Console Gaming Y-Adapter has a 3.5 mm stereo jack on one end
and two RCA jacks on the other — one red and one white.
3. Locate the red and white RCA plugs on the end of the cable
connected to the back of your console gaming system. Connect them
to the matching red and white RCA jacks on the Console Gaming
Y-Adapter.
4. Locate the 3.5mm stereo cable and connect one end to the auxiliary
input (AUX) on the side of the right speaker, and the other end to
the 3.5mm stereo jack on the Console Gaming Y-Adapter.
XT2
Two-Piece Dual-Powered
Portable Audio System