


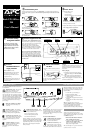


:DOO0RXQWLQJRI836RSWLRQDO
APC Back-UPS Office can be mounted vertically or horizontally to a wall surface. Use the template below to position the securing fasteners (not supplied) .
Note: Position the On/Off switch to the right for horizontal mounting, to the top for vertical.
1. Hold this page against the wall with the appropriate edge parallel to the floor.
2. Use thumbtacks to hold this page in place. Make sure the template circles line up where you want
the mounting fasteners to be installed. Use a sharp nail or pin to puncture the center of each
appropriate template circle to mark the wall.
3. Install fasteners at the marked locations. Leave the head of both fasteners 5/16" (8 mm) out from
the surface of the wall. Fasteners must be able to support 15 lb (6.8 kg).
4. Mount APC Back-UPS Office by positioning the key-hole slots over the fastener heads. For
vertical mounting, slide the unit down into place. For horizontal mounting, turn it slightly
counterclockwise until it is securely in place.
&LUFXLW%UHDNHU
If APC Back-UPS Office is severely overloaded the circuit breaker will trip to disconnect the unit
from utility power. When this occurs, the button will pop up, and no outlets will provide power. If
this happens, consult the Troubleshooting section.
2UGHU5HSODFHPHQW%DWWHU\
The APC part number for APC Back-UPS Office 280 replacement battery cartridge (RBC) is
RBC10. A replacement battery can be ordered from local retailers, APC, or the APC website.
%DWWHU\5HSODFHPHQW
Battery replacement is a safe procedure, isolated from electrical hazards.
Do not replace the battery when the UPS is “On-Battery.”
Please consult the diagrams in the “Connect Battery Wire” procedure during this procedure.
Procedure:
1. Switch “Off”, and unplug all equipment from APC Back-UPS Office.
2. Switch “Off” APC Back-UPS Office, and unplug it from the wall outlet.
3. Refer to the “Connect battery wire” (Step 1) section of the manual for instructions on
how to open the battery compartment.
4. Disconnect the battery wires one at a time.
5. Grasp each wire connector and pull straight back. Take care not to pull the wires.
6. Remove the old battery.
7. Connect the red wire to the positive (+) battery terminal of the replacement battery.
Connect the black wire to the negative (-) battery terminal.
8. Tip the new battery, terminal end first, into the battery compartment.
Press the battery gently until the retaining clip snaps into place.
Note: Small sparks at the battery connections are normal during connection.
9. Slide the battery compartment cover back into place. The new battery must be
charged for at least 4 hours before full runtime can be expected.
Note: The spent battery must be recycled. Deliver the battery to an appropriate
recycling facility or return it (in the new battery’s packing material) to APC. See
the new battery instructions for additional recycling information.
8366WRUDJH
Before storing, charge the UPS for at least 10 hours.
Store the UPS covered and upright in a cool, dry location.
Extended Storage
Storage Temperature Recharge Frequency Charging Duration
5 to 86
o
F (-15 to 30
o
C) Every 6 Months 10 Hours
86 to 113
o
F (30 to 45
o
C) Every Month 10 Hours
6SHFLILFDWLRQV
Acceptable Input Voltage 0 - 150 Vac, Single Phase
“On Battery” Output Voltage 109-121 Vac
Frequency Limits (“On Line”) 57 - 63 Hz
Maximum Load - Battery Power
Supplied Outlets
280 VA, 170 W
Maximum Load - Surge Protected Only
Outlets
10 A
Typical Recharge Time 12 hours from total discharge
Operating /Storage Temperature
32 to 95
°
F (0 to 35
°
C) / 5 to 113
°
F (-15 to 45
°
C)
Operating and Storage Relative
Humidity
0 to 95%, non-condensing
Operating Elevation/ Storage Elevation 0 to +10,000 ft (0 to +3,000 m) 0 to +50,000 ft (0 to +15,000 m)
UPS Size (H x W x D) excluding cord 2.7 x 17.0 x 7.0 in (6.9 x 43.2 x 17.8 cm)
UPS Weight / Shipping Weight 8.0 lb (3.6 kg) 8.5 lb (3.9 kg)
EMI Classification FCC/DOC Class B
:DUUDQW\
Users must contact customer service to troubleshoot the unit before returning the unit to APC. The
standard warranty is 2 years from date of purchase. APC’s standard procedure is to replace the
original unit with a factory reconditioned unit. Customers who must have the original unit back due
to assigned asset tags and set depreciation schedules must declare such a need at first contact with
APC Customer Service. APC will ship out the replacement unit once the defective unit has been
received by the repair department or cross ship upon the provision of a valid credit card number.
The customer pays for the shipping to APC, and APC pays ground freight transportation costs back
to the customer.
7URXEOHVKRRWLQJ
Symptom Possible Cause Solution
If the UPS is switched “On,”
outlets are not working, and the
On Line indicator-unlit.
The battery wire is
not connected.
Connect the battery wire as shown
in Step 1 of the installation
instructions (front page of the
User’s Manual.).
Circuit breaker popped up. The outlets are
overloaded.
Unplug one piece (or more) of
equipment from the UPS and reset
the breaker by pressing the button
in.
UPS does not provide expected
runtime.
The battery is not
charged.
UPS does not charge the battery
when it is turned “Off.” Always
keep the UPS “On” when utility
power is available.
The battery is
depleted by
frequent power
outages.
After saving files and switching
“Off” the computer, switch the
UPS “Off” during extended power
failures-to conserve battery
capacity.
UPS fails to power the connected
equipment during utility failure or
Self -Test, and beeps for 30 seconds.
The Battery Power
Supplied outlets
are overloaded.
Unplug one piece of equipment
from the Battery Power Supplied
outlets.
On Battery indicator is lit and is
accompanied by a two-tone audible
alarm. Run time is reduced.
The Battery Power
Supplied outlets
are severely
overloaded.
1. Unplug one piece of
equipment from the Battery
Power Supplied outlets.
2. Perform the UPS Shutdown
Procedure
3. Switch the On/Off switch to
“Off,” and then “On” again.
If no overload alarm is sounded
when the Self-Test is completed,
the unplugged device is likely to be
responsible for the overload.
6HUYLFH
Note: If the UPS requires service, do not return it to the dealer! The
following steps should be taken.
1. Consult the Troubleshooting section to eliminate common problems.
2. Verify that the circuit breaker is not tripped. A tripped circuit breaker is the most common UPS
problem!
3. If the problem persists, consult the APC web site (www.apcc.com) or contact APC at
(800-800-4272).
• Record the model number of the UPS, the serial number, and the date purchased. Be
prepared to troubleshoot the problem over the telephone with a technician If this is not
successful, the technician will issue a Return Merchandise Authorization Number (RMA#)
and a shipping address.
4. If customer service troubleshooting is unsuccessful:
• If the UPS is under warranty, repairs are free.
• If the warranty has expired, there is a repair charge.
5. Disconnect the black wire from the UPS battery.
Department of Transportation (DOT) regulations require that the black battery wire be
disconnected before shipping the UPS back to APC. The “Connect Battery Wire”
instructions and graphics on the front page show how to access the wire.
6. Pack the UPS in its original packaging. If the original packing is not available, ask customer
service about obtaining a new set. Pack the UPS properly to avoid damage in transit.
Note: Never use Styrofoam™ beads for packaging. Damage sustained in transit is not covered
under warranty (insuring the package for full value is recommended).
7. Write the RMA# on the outside of the package.
8. Return the UPS by insured, prepaid carrier to the address given to you by customer service.
$3&&RQWDFW,QIRUPDWLRQ
USA/Canada …………….
Mexico……………………
Brazil …………………….
Worldwide ………………
1.800.800.4272
292.0253 / 292.0255
0800.12.72.1
1.401.789.5735
Internet and
Tech Support
http://www.apcc.com
Horizontal and Vertical
Mounting
Horizontal Mounting
Only
Vertical Mounting
Only