


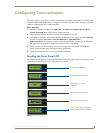

Configuring Communication
53
MAX-CSE/MAX-CSD10 Operation/Reference Guide
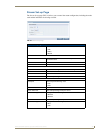
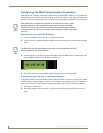
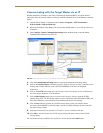
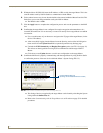
3. Press the Enter key on your keyboard to initiate the communication process and launch the initial
on-screen Enter Network Password security dialog. (FIG. 33).
4. Enter the words administrator and password into the corresponding User Name/Password fields
(case-sensitive). This is the factory default security login information. This login profile can later be
changed.
5. Place a checkmark in the Use the Save this password in your password list selection box to save
both the username and password to the MAX unit and use them as your defaults during the next new
login to the target unit.
Unchecking this "save login profile" option causes a user to have to re-enter both the
username and password upon every consecutive login. Leaving this box unchecked helps add
to the security feature of the unit by requiring the user to have the proper information.
6. Click OK to enter the information and proceed to the first UI page.
Assigning a Static IP Address to the MAX-CSE via the Browser-Based UI
Although the initial communication to the unit is done via a DHCP connection and since this is your
source device, it is recommended that for streaming and programming purposes, you assign a Static IP
Address to the unit via the browser-based UI.
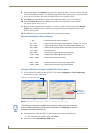
Located on the left side of the populated browser window is the Navigation frame which allows a user to
navigate throughout the application. Located on the right side of the browser window is the Active frame
which displays the pages corresponding to the currently selected option from within the Navigation
frame.
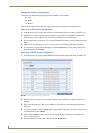
1. Access the IP Settings page (FIG. 20 on page 37) by clicking the IP Settings button in the
Navigation Bar.
This page is used to assign the method of communication used by the target MAX unit.
Note that both the default IP Configuration setting is DHCP and the corresponding read-only
fields display the MAX unit’s communication parameters obtained from the DHCP Server
during the initial setup.
2. Click on the Static radio box to begin entering the previously obtained Static IP Address
information (typically provided by your Network Administrator).
3. Enter the corresponding Static IP Address, Subnet Mask, Gateway, and DNS parameters into their
corresponding fields on this page.
4. Click the Apply button to refresh the screen and save your new communication parameters.
5. Once the browser’s progress bar indicates it has completed the temporary acceptance of the new
parameters, click the Reboot button to restart the unit and incorporate these changes.
FIG. 33 Enter Network Password security dialog
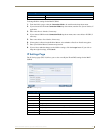
Save login profile
selection box