


Initial Configuration and Firmware Upgrade
5
NI Series WebConsole & Programming Guide
Initial Configuration and Firmware Upgrade
This section describes using the NetLinx Studio software application to perform the initial configuration
of the Master, as well as upgrading the firmware for various Master components.
NetLinx Studio is used to setup a System number, obtain/assign the IP/URL for the connected
NI Controller, and transfer firmware Kit files to the Master.
NetLinx Studio is available to download (free of charge) from www.amx.com.
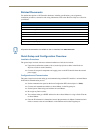
Before You Start
1. Verify you have the latest version of NetLinx Studio on your PC. Use the Web Update option in
NetLinx Studio’s Help menu to obtain the latest version. Alternatively, go to www.amx.com and
login as a Dealer to download the latest version.
2. Verify that an Ethernet/ICSNet cable is connected from the NI Controller to the Ethernet Hub.
3. Connect an programming cable (RS-232) from the Program Port on the NI Controller to a COM
port on the PC being used for programming.
4. Verify that any control cards (NI-4000 and NI-4100 only) are inserted and their respective
connectors are attached to the rear of the NI Controller before continuing.
5. Verify that the NI Controller is powered On.
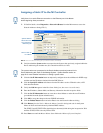
Using the ID Button to Change the Master Device Value
The steps described and the dialogs shown in this section are in the NetLinx Studio application.
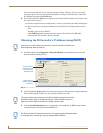
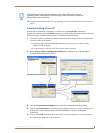
1. Access the Device Addressing dialog (FIG. 1) by selecting Diagnostics > Device Addressing.
2. In the Device field (A in FIG. 1), enter the new value for the NI Controller (range = 0 - 32767).
3. Press the Start Identify Mode button (B in FIG. 1).
Before commencing, verify you are using the latest firmware Kit file (this file contains
both the NI Integrated Controller and on-board Master firmware.
The NI-4000/3000/2000 Kit file begins with 2105_X000.
The NI-4100/3100/2100 Kit file begins with 2105_04_X100.
The NI-700/900 Kit file begins with 2105_03_NI-X00 and 2105_09_NI-X00
respectively.
FIG. 1 NetLinx Studio: Device Addressing dialog (using the ID mode to set the NI Controller’s device value)
Enter the Master’s new Device value
Assign the new value to the Master
A
B