


Studio Devil Virtual Bass Amp – User’s Guide, Page 8 of 9
©2008 Gallo Engineering & Design, PLLC. All rights reserved. “Virtual Bass Amp”, “Studio Devil VBA”, Studio Devil and the Studio Devil logo are trademarks of Gallo Engineering &
Design, PLLC. VST and the VST logo are trademarks of Steinberg Media Technologies, GmbH. Audio Units is a trademark of Apple, Inc.
Pro Tools and RTAS are trademarks of Digidesign. All other trademarks are property of their respective owners.
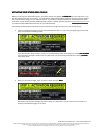
The GRAPHIC EQ comes after all the PREAMP, TONE, and POWER AMP / LIMITER processes and lets you adjust
the overall tonal character of your bass sound. Why have a GRAPHIC EQ when you already have tone controls?
Well, first, it has more bands and finer control than the tone controls. But more importantly, it comes after the
preamp distortion and power amp compression so it allows you to control the overall tone without changing the
other effects. Playing around with the subtle interplay between your tone knobs and the GRAPHIC EQ is where
you’ll discover all the great tones Studio Devil Virtual Bass Amp delivers. Here’s how the GRAPHIC EQ controls
work:
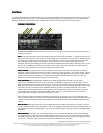
EQ SLIDERS:
EQ SLIDERS: EQ SLIDERS:
EQ SLIDERS: Each of the graphic EQ’s seven sliders (starting from the left) lets you adjust the boost or cut for
frequencies within a certain band. Slide the handle up for more boost, or slide it down for less. Going from left to
right, the frequency bands go from bass (lows) to treble (highs). The frequencies for each band are specifically
chosen to work well with bass guitar and to give you lots of control over your sound.
LEVEL SLIDER
LEVEL SLIDERLEVEL SLIDER
LEVEL SLIDER:
: :
: The rightmost graphic EQ slider controls the overall LEVEL of the EQ’s output. This comes in
useful to balance the overall volume of your bass between EQ on and EQ off settings. Another useful trick is to
set the EQ sliders all in the middle for no tonal change and use the LEVEL slider just to control the overall volume
output. Either way, the LEVEL slider lets you set your output volume when the EQ is enabled.
ENABLE
ENABLEENABLE
ENABLE BUTTON
BUTTON BUTTON
BUTTON: Pushing this button turns on the GRAPHIC EQ feature. Pushing it again turns it off. You can use
this control to make quick comparisons of your EQ settings to see how it’s affecting your sound. This button lights
up to let you know when the GRAPHIC EQ effect is enabled.
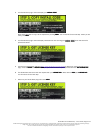
CABINET SWITCH
CABINET SWITCHCABINET SWITCH
CABINET SWITCH
Without a bass speaker cabinet, bass distortion and compression might sound thin and harsh. The “cabinet”
switch allows you to select a basic cabinet modeling filter to get the effect of hooking your amp up to a real bass
cabinet. There are 3 settings to choose from:
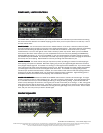
4x10
4x104x10
4x10: This setting emulates a miked-up 4x10 cabinet. It has a punchy bass and a slightly metallic, flangy tone
characteristic. This is the best setting for modern, loud tones.
1x15
1x151x15
1x15: This position is for a deeper, mellower sound like those you get from single 1x15 cabinets. This sound has
less highs and is a bit more “boxier” than the 4x10 setting. This setting makes for great classic and vintage bass
tones that really stand out.
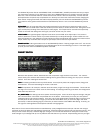
D.I. (
D.I. (D.I. (
D.I. (DIRECT BOX
DIRECT BOXDIRECT BOX
DIRECT BOX)
))
): This setting acts like a speaker simulator bypass. It lets a lot of the high end through, and gets
that “recorded direct” sound that many bassists love in the studio. It also allows you to use your own speaker
modeling plug-ins and impulse modelers. There are a lot of really great speaker modeling plug-ins out there, and
we want you to be able to use them to get your sound with Studio Devil! So if you chain our plug-in with other
power-amp or cabinet modeling plug-ins, make sure you set this switch to the DIRECT BOX setting. That way, you
won’t get the clashing effects of two speaker cabinets running together!
Well, that’s it for the controls of Studio Devil Virtual Bass Amp…pretty straightforward and simple. But the main thing to
remember is this is all about tone and getting a great sound. Experiment with the controls until you find what you like. And
take your time to listen and play a while through your changes. You will find that Studio Devil reacts just like real amps,
small changes in your settings add up to a very different feel and texture of your sound. Keep tweaking until it’s just right!