


2-42-4
2-42-4
2-4
Chapter 2: Hardware informationChapter 2: Hardware information
Chapter 2: Hardware informationChapter 2: Hardware information
Chapter 2: Hardware information
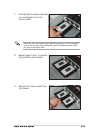
6. Remove the adhesive label
underneath a plate.
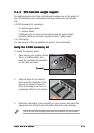
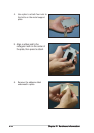
4. Use a plier to attach four nuts to
the bolts on the metal support
plate.
5. Align a rubber pad to the
rectagular mark on the center of
the plate, then press to attach.