


5-385-38
5-385-38
5-38
Chapter 5: Software supportChapter 5: Software support
Chapter 5: Software supportChapter 5: Software support
Chapter 5: Software support
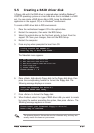
3. Insert a formatted high-density floppy disk to the floppy disk drive.
4. Follow screen instructions to complete the process.
5. After creating a RAID driver disk, eject the floppy disk, then
write-protect it to prevent computer virus infection.
To install the RAID driver:
1. Install an operating system to the selected hard disk drive. During
installation, the computer prompts you to press the
F6F6
F6F6
F 6 key if you are
installing a third-party SCSI or RAID driver.
2. Press <F6>,
then insert the RAID driver disk to the floppy disk drive.
3. Follow screen instructions to install the RAID drivers.
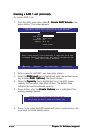
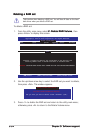
To create a RAID driver disk in Windows
®
environment:
1. Place the motherboard support CD in the optical drive.
2. Click the
Make Disk Make Disk
Make Disk Make Disk
Make Disk menu tab, then select the RAID driver disk you
wish to create:
• Click
Make ICH7R 32 bit RAID Driver DiskMake ICH7R 32 bit RAID Driver Disk
Make ICH7R 32 bit RAID Driver DiskMake ICH7R 32 bit RAID Driver Disk
Make ICH7R 32 bit RAID Driver Disk to create an Intel
®
ICH7R RAID driver disk for a 32-bit system.
•
Click
Make ICH7R 64 bit RAID Driver DiskMake ICH7R 64 bit RAID Driver Disk
Make ICH7R 64 bit RAID Driver DiskMake ICH7R 64 bit RAID Driver Disk
Make ICH7R 64 bit RAID Driver Disk to create an Intel
®
ICH7R RAID driver disk for a 64-bit system.
•
Click
Make Marvell 88SE6141 SATA2 RAID Driver DiskMake Marvell 88SE6141 SATA2 RAID Driver Disk
Make Marvell 88SE6141 SATA2 RAID Driver DiskMake Marvell 88SE6141 SATA2 RAID Driver Disk
Make Marvell 88SE6141 SATA2 RAID Driver Disk to
create a Marvell
®
88SE6141 SATA2 RAID driver disk for a 32-bit
system.
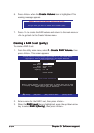
OrOr
OrOr
Or
Browse the contents of the support CD to locate the
driver disk
utility.
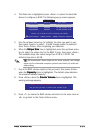
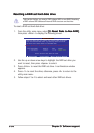
9. The RAID drivers are copied to the floppy disk. After creating a RAID
driver disk, eject the floppy disk, then write-protect it to prevent
computer virus infection.
10. Press any key to return to the Makedisk menu.
Refer to section “5.2.4 Make Disk menu” for details.