


13
ATTO Technology Inc. FibreBridge Installation and Operation Manual
2.0 Install the FibreBridge
If you have not already completed the instructions on the Quick Start page packed with your
FibreBridge, use the following instructions to install the FibreBridge.
Unpack the packing box; verify contents
• The FibreBridge. Note the serial number of your
FibreBridge unit: ________________________
• Power cord
• “L” brackets for mounting in a 19” rack
• Ethernet cable
• RS 232 cable
• CD which includes the Firmware, Installation
and Operation Manual, QuickNAV™ IP
discovery program and system drivers
Install the FibreBridge
1 Place the FibreBridge on a stable flat surface,
install it into a standard rack or into your device.
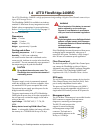
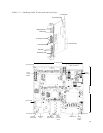
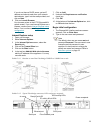
If installing the Fibre Bridge 2390R/D or the
FibreBridge 2400 R/D into a rack, see
Exhibit 2.0-1 and follow these instructions:
a. Attach “L” brackets so that the front side
with the LEDs face front and the connector
side is at the back.
b. Install the FibreBridge horizontally within
the rack so it does not reduce the air flow
within the rack.
2 Connect and power up Fibre Channel devices
from your SAN to the FibreBridge using SFPs
and multimode fiber optic cables for the Fibre
Channel ports. Keep cable lengths as short as
possible to ensure the highest signal quality
and performance. Refer to
Cabling
on page i of
the Appendix.
3 Connect and power up SCSI target devices.
Refer to
Cabling
on page i of the Appendix.
4 Connect the Ethernet port to your network.
5 Connect power according to the FibreBridge
model:
• For the FibreBridge 2370E, FibreBridge
2390C and Fibre Bridge 2400C, connect the
power connector to the FibreBridge.
• For the FibreBridge 2390C and FibreBridge
2400C, power is already connected if you
have installed the unit using the cPCI
connection.
• For the FibreBridge 2390R/D and the
FibreBridge 2400R/D, connect the AC power
cord from the FibreBridge to the proper AC
source outlet and turn on the power using the
power switch.
CAUTIONCAUTION
The power source must be connected to a
protective earth ground and comply with
local electrical codes. Improper grounding
may result in an electrical shock or damage
to the unit.
If you are using a rack:
a. Properly ground the FibreBridge to the rack
equipment. The earth ground connection
must be maintained.
b. The power requirements plus the power
draw of the other equipment in the rack
must not overload the supply circuit and/or
wiring of the rack.
6 Wait up to two minutes for the FibreBridge
Ready LED to light indicating the FibreBridge
has completed its power-on self test sequence.
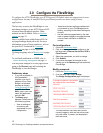
Discover the IP address
Note
The FibreBridge is initially configured with
DHCP enabled. It is best if you have access to
a DHCP server.
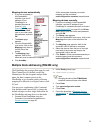
1 Work from the computer attached to the
FibreBridge Ethernet port on the same domain.
From the CD supplied with your FibreBridge,
run the QuickNav Utility
QuickNAV-
windows.exe
for Windows or QuickNAV-Mac
for Mac OS X.
2 Locate the FibreBridge with the serial number
recorded earlier.
3 Highlight the serial number.
4 Click
Next.
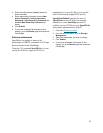
If a DHCP server is available on your network,
an address is assigned automatically by the
server. Note the assigned address:
_____________________________________