


ENGLISH
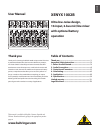
XENYX 1002B User Manual
3
Before You Get Started1.
Shipment1.1
Your XENYX 1002B was carefully packed at the factory and the
packaging is designed to protect the unit from rough handling.
Nevertheless, we recommend that you carefully examine the
packaging and its contents for any signs of physical damage
which may have occurred during transit.
If the unit is damaged, please do NOT return it to
◊
BEHRINGER, but notify your dealer and the shipping
◊
company immediately. Otherwise, claims for damage or
replacement may not be granted.
We recommend that you use a ight case, so as to give your
◊
power mixer optimum protection during use or transport.
Always use the original packing carton to prevent damage
◊
during storage or transport.
Make sure that children cannot play unsupervised with the
◊
device or its packaging.
Please ensure proper disposal of all packing materials.
◊
Online registration1.2
Please do remember to register your new BEHRINGER equip-
ment right after your purchase by visiting www.behringer.com
(alternatively www.behringer.de) and kindly read the terms and
conditions of our warranty carefully.
Should your BEHRINGER product malfunction, our goal is to
have it repaired as quickly as possible. To arrange for warranty
service, please contact the retailer from whom the equipment
was purchased. Should your BEHRINGER dealer not be located
in your vicinity, you may directly contact one of our subsidiaries.
Corresponding contact information is included in the original
equipment packaging (Global Contact Information/European
Contact Information). Should your country not be listed, please
contact the distributor nearest you. A list of distributors can be
found in the support area of our website (www.behringer.com).
Registering your purchase and equipment with us helps us
process your repair claims quicker and more efciently.
Thank you for your cooperation!
Basic Operation 1.3
The XENYX 1002B is easy to use. Simply follow these steps to
achieve the best possible sound:
Plug the included power cable into the back of the mixer. 1.
Plug the other end of the cable into a mains outlet. DO NOT
turn the mixer on yet.
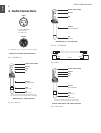
Make all appropriate audio connections:2.
Connect microphones to the MIC jacks using XLR cables.•
Connect line-level sources to the LINE IN jacks using ¼" •
TS cables.
Connect stereo sources (keyboard, drum machine) to one •
of the stereo LINE IN jacks using a pair of ¼" TS cables.
Connect a CD player to the 2 TRACK INPUT using ¼" or •
RCA cables.
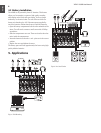
See Applications chapter for more details and options. •
Connect a monitoring source or speaker system. You may 3.
connect powered studio monitors, powered loudspeakers or
a power amp to the MAIN OUTPUT jacks. You may also
connect a pair of headphones to the PHONES jack. Leave
powered speakers and/or power amps turned off until the
mixer has been powered on.
Turn all PAN/BAL and EQ knobs to their center (12 o’clock) 4.
position. Set all other knobs and faders all the way down/off.
Once all connections have been made, you may turn the 5.
mixer on.
After the mixer is turned on, you may also turn the speakers 6.
or power amp on.
Set the input gain level for each channel using the GAIN 7.
knob. While testing the audio source, turn the GAIN knob as
high as possible without allowing the CLIP LED to light. See
the Gain Setting section for details.
Raise the MAIN fader to 0. You may adjust it further as you 8.
begin to set levels.
Adjust all channel volume faders until you achieve a bal-9.
anced mix.
Make sure that the channel CLIP LEDs and MAIN CLIP 10.
LEDs do not light frequently. If this happens, adjust the
respective GAIN or MAIN fader accordingly.
Congratulations! You have now set up a basic mix! The 11.
1002B offers many other cool features as well, so continue
through the manual to make the most out of this powerful
little mixer.