


ENGLISH
XENYX 1002B User Manual
6
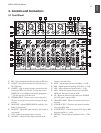
MAIN OUTPUT
[18]
– Connect to the inputs of a power amp or
powered speakers using ¼" TS cables.
FX SEND
[19]
– Connect to the input of an external effects
device using a ¼" TS cable.
MON SEND
[20]
– Connect to the input of a powered monitor or
monitor power amp using a ¼" TS cable.
VU CLIP
[21]
– Lights when the MAIN OUTPUT signal begins
to overload.
PHANTOM
[22]
– Sends 23V of power to the XLR MIC inputs
for use with condenser microphones. When used with
batteries, 18V of power is supplied.
VU METER
[23]
– Displays the MAIN OUTPUT signal level.
MON SEND
[24]
– Adjusts the output at the MON SEND jack.
FX SEND
[25]
– Adjusts the output at the FX SEND jack.
PHONES
[26]
– Adjusts the output at the PHONES jack.
MAIN FADER
[27]
– Adjusts the overall output of the mixer
through the MAIN OUTPUTS. It also affects the signal at
the PHONES out and 2-TRACK OUTPUT.
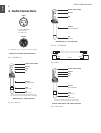
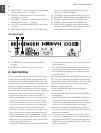
Rear Panel3.2
AC POWER IN
[28]
– Connect the mains power cable into
this input.
POWER ON
[29]
– Turns the mixer’s power on and off.
Gain Setting4.
It is very important to set each channel’s GAIN knob correctly
in order to get the maximum amount of signal headroom and
least amount of noise possible. Setting the GAIN too low could
make that channel too quiet to mix properly, while setting it too
high will cause clipping and distortion. Stereo channels 3/4, 5/6
and 7/8 allow the MIC and LINE inputs to be used in parallel
thanks to the dedicated GAIN knobs for each input. Follow these
instructions to set the gain for each channel and situation:
Plug the audio source into the channel input (XLR or ¼"). •
Sing into the microphone or play the line-level source at the •
volume you will ultimately use during recording or perfor-
mance. If you set the gain for a vocal mic by saying “check”
into it, this gain setting will probably not be as loud as the
actual vocal performance. Setting the gain this way will
lead you to set the gain too high, which may cause the extra
loud vocal performance to overload and distort. Likewise, if
checking a mic that will record a saxophone, make sure the
performer plays close to the mic while setting the gain. For
keyboards, do not change the output volume of the keyboard
after the mixer’s gain has been set.
Turn the GAIN knob clockwise until the red CLIP LED lights •
up. This means the channel has begun to overload (too much
signal is allowed in).
Turn the GAIN knob counterclockwise a small amount, then •
sing or play again. Ideally, the GAIN knob should be set as
high as possible while allowing the CLIP LED to only light
occasionally, if at all.
If you must use both the MIC and LINE inputs on channels 3/4,
5/6, or 7/8, you can adjust the gain setting for each source indi-
vidually thanks to the dedicated GAIN knobs. The channel fader
affects the level of both sources, so achieving a good balance
between the 2 inputs can be tricky.
Set the gain for the MIC input using the GAIN MIC as •
described above.
Set the gain for the LINE input(s) using the GAIN LINE as •
described above.
Both GAIN knobs share the same CLIP LED, so when both •
sources are in use at the same time, neither input should
cause the LED to light. If this happens, turn each GAIN knob
down one at a time to determine which is overloading.
Raise the channel fader so that both sources are audible in •
the overall mix. Ideally, they will already be balanced and not
require further adjustment.
If one source is too quiet with the fader turned up, turn the •
louder source’s GAIN knob down a bit, then raise the fader to
the appropriate level. DO NOT simply turn the quiet source’s
GAIN knob up until it is loud enough, as this will likely cause
clipping and distortion.