


Operation
64
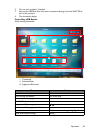
Using the broadcassting function
When it comes to 1:N LAN Dispaly,there are two ways to do this function:
1. By TCP/IP (support up to 8 porjectors, original design)
2. By Multicast(support up to 255 projectors, this new design)
You can select channel 1, 2, 3, 4, 5,6...25 with showing the corrspondent IP(gray out).
There are 1~25 channels (25IPs) for you to select freely:
239.192.19.21~239.192.19.45
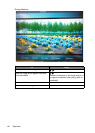
If the channel is fixed at emergency channel, when projector detects image coming in from
this channel, it will project this image automatically. There is no need to switch sources
manually.
To acticate this function:
The function requires special version of the QPresenter. Please download it from your User
Manuel CD.
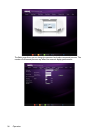
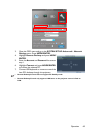
1. Go to the SYSTEM SETUP: Advanced > Network Settings menu after
opening the OSD menu system. Press MODE/ENTER.
2. Press to highlight Broadcasting and press / to select On.
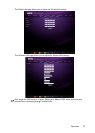
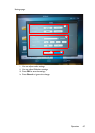
3. Open the Advanced Settings page in the Qpresenter.
4. Click Ye s in the Activating Broadcasting row and click Apply.
Or
1. Open the Projector Network Display System and go to the Basic page.
2. Click On in the Broadcasting row and select a channel using the drop-down list.
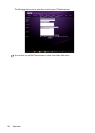
3. Open the Advanced Settings page in the Qpresenter.
4. Click Ye s in the Activating Broadcasting row and click Apply.
• This function is only available when the Network Display source is selected.
• The minimum system requirement for your computer is Intel Core 2 Dou 2.4GHz CPU, 2G
DDR.
Presenting From a USB Reader
This fature displays a slide show of images stored on a USB flash drive connected to the
projector. It can eliminate the need for a computer source.
Image File Types
USB Reader displays images files in JPEG, GIF, TIFF, PNG and BMP formats.
• A square box will display on the filename for unidentified characters.
• Thai filename is not supported.
• Files in GIF, TIFF, PNG and BMP formats can be displayed for the file size smaller than
WXGA (1280 x 800) only.
• If a folder consists of more than 200 photos, only the first 200 photos can be displayed.
Preparation
To view your pictures as a slideshow, follow these steps:
1. Connect a USB flash drive to your computer and copy files from your computer to
the USB flash drive.