


Chapter 23: RMON Configuration Guide
318 SmartSwitch Router User Reference Manual
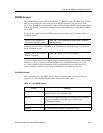
A row in the control table is created for each port on the SSR, with the owner set to
“monitor”. If you want, you can change the owner by using the appropriate rmon
command. See the section “Configuring RMON Groups” in this chapter for more the
command to configure a specific group.
Note:
Control tables other than the default control tables must be configured with CLI
commands, as described in “Configuring RMON Groups”.
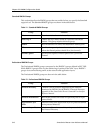
Using RMON
RMON on the SSR allows you to analyze network traffic patterns, set up alarms to detect
potential problems before they turn into real congestive situations, identify heavy
network users to assess their possible candidacy for moves to dedicated or higher speed
ports, and analyze traffic patterns to facilitate more long-term network planning.
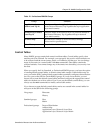
RMON 1 provides layer 2 information. Traffic flowing through the SSR’s layer 2 ASIC is
collected by RMON 1 groups. RMON 2 in the SSR provides layer 3 traffic information for
IP and IPX protocols. Traffic flowing through the SSR’s layer 3 ASIC is collected by RMON
2 groups. The SSR’s RMON 2 protocol directory contains over 500 protocols that can be
decoded for UDP and TCP ports. You can use RMON to see the kinds of protocol traffic
being received on a given port.
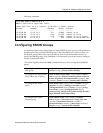
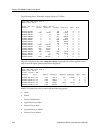
For example, use the rmon show protocol-distribution command to see the kinds of
traffic received on a given port:
In the example output above, only HTTP and ICMP traffic is being received on this port.
To find out which host or user is using these applications/protocols on this port, use the
ssr# rmon show protocol-distribution et.5.5
RMON II Protocol Distribution Table
Index: 506, Port: et.1.7, Owner: monitor
Pkts Octets Protocol
---- ------ --------
19 1586 ether2
19 1586 ether2.ip-v4
19 1586 *ether2.ip-v4
2 192 *ether2.ip-v4.icmp
17 1394 *ether2.ip-v4.tcp
17 1394 *ether2.ip-v4.tcp.www-http