


Appendix A. Changing COM220
Settings
Changing any of the modem's settings may result in
communication problems. After changing the settings, try
the modem locally before installing it at a remote location.
To speed problem resolution when contacting Campbell
Scientific for support, please inform us of any modem
setting changes that have been made.
CAUTION
A.1 DIP Switch Settings
The following COM220 settings are changed by opening or closing DIP
switches:
1) Communication mode, either Synchronous Device Communication (SDC)
or Modem Enable (ME)
2) ME baud-rate
3) PakBus ready.
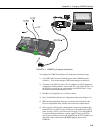
To change DIP switch settings, the outer cover must first be removed by
unscrewing and removing the five Philips head screws on the cover.
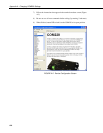
It is necessary to cycle power to the COM220 for changes
to the DIP switch settings to take effect. This is done by
removing the 9 pin connector for about 5 seconds. As with
other devices, if you leave the power off for too short a
time, you may get unexpected results.
IMPORTANT
DIP Switches 1 and 2: SDC or Modem Enable
The COM220 supports Synchronous Device Communication (SDC) and
Modem Enable (ME) communication. Switch 1 selects between SDC and ME.
If switch 1 is open, ME mode is selected. If switch 1 is closed and switch 2 is
open (default), SDC7 is selected. If both switch 1 and 2 are closed, SDC8 is
selected. SDC is not supported by non-Pakbus operating systems (e.g.,
CR10X, CR23X, CR7, CR510). Hence, to connect with these older
dataloggers, switch 1 must be open (i.e., Modem Enable mode selected).
DIP Switches 3 and 4: ME Baud-rates
DIP switches 3 and 4 only have effect when the COM220 is in Modem Enable
mode. If the COM220 is in ME mode, switches 3 and 4 select the baud-rate
setting between the COM220 and the datalogger as follows:
A-1