


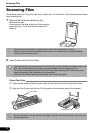


Scanning Film
10
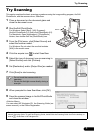
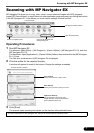
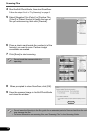
4 Start ArcSoft PhotoStudio, then start ScanGear.
Follow the steps 2 to 4 in "Try Scanning" on page 5.
5 Select [Negative Film (Color)] or [Positive Film
(Color)] in [Select Source] to match the type of
film you are scanning, then click [Preview].
6 Place a check mark beside the number(s) of the
frame(s) you want to scan. Perform image
corrections as needed.
7 Click [Scan] to start scanning.
8 When prompted to close ScanGear, click [OK].
9 Save the scanned image in ArcSoft PhotoStudio
and close the window.
Do not touch the scanner while it is
operating.
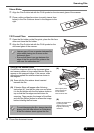
• Do not leave the film strip in the film guide for an extended period of time as heat from the unit
may damage the film.
• For more information on scanning film, see “Scanning Film” in the Scanning Guide.