


E-10
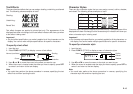
• Mirror image printing indicator
This indicator appears when the Label Printer is set up for mirror image printing.
Normal (non mirror image) printing is performed when this indicator is not shown.
• Manual feed indicator
This indicator appears when you are using manual feed instead of auto feed.
Auto feed is in effect when this indicator is not on the display.
Important!
• After you finish printing when using manual feed, be sure to always press
FUNC and then PRINT (FEED) to feed the tape before cutting it. If you don’t
you will cut off part of the printed text.
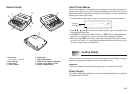
• Cursor
The cursor shows the next input position. Any character you input appears at
the point where the cursor is located.
• Character position marks
These marks show where characters will appear as you input them. This part of
the display is always blank when you turn power on.
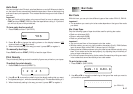
Basic Alpha-Numeric Input
The following operation shows you the basic procedures for inputting letters
and numbers. We will explain the procedure by inputting the following characters
using the default initial power-on screen.
ABXYZ Computer Company
1234567890
Note
• If you hold down any key, it will repeat its operation or input at high speed until
you release it.
To input alpha-numeric characters
1. Turn power on.
2. Input the first line of characters.
• To input the upper-case letters, you can use either SHIFT or CAPS. With
SHIFT you must shift the keyboard for each character. With CAPS the keyboard
stays in upper-case until you press CAPS again.
• Press SPACE to input spaces.
• If you input a wrong character, press BS to delete it and input again. See
page E-11 for other details on editing text.
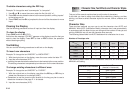
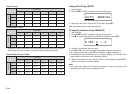
Key Operation Input Key Operation Input Key Operation Input
CODE U Ü
CODE O Œ
CODE P Å
CODE A Æ
CODE J Ö
CODE K Ä
CODE L J
CODE Z W
CODE C Ç
CODE N Ñ
CODE 1 ´
CODE 2 `
CODE 3 ¨
CODE 4 ˜
■ CAPS on
3. When you reach the end of a line of text, press B (the L cursor key) to
input a newline mark.
• A newline operation is indicated on the display by the B symbol. This shows
where you changed lines.
• The maximum number of lines you can input depends on the width of the
tape you have loaded in the Label Printer.
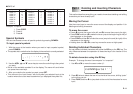
Tape Width Maximum Number of Lines
• 6mm ............................ 1
• 9mm ............................ 1
• 12mm .......................... 2
• 18mm .......................... 3
• 24mm .......................... 3
4. Input the characters in the second line.
5. To print the text that you input, press PRINT. For details on printing, see
page E-16.
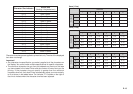
About the CODE key…
The CODE key makes it possible to input punctuation needed for a number of
different languages. The following shows the key operations you should use for
each of the characters formed using the CODE key.
CODE 5 ˆ
CODE 6 ˇ
CODE 7 °
CODE 8 /
CODE 9 ˝
CODE 0
˛