


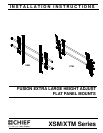
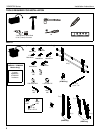


XSM/XTM Series Installation Instructions
8
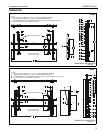
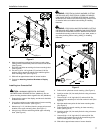
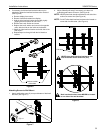
Attaching Interface Brackets to Display
1. Align the center of the bracket with center of screen.
(See Figure 4)
NOTE: The diamond-shape hole in the bracket corresponds to
the center of the mount.
Figure 4
WARNING: IMPROPER INSTALLATION CAN LEAD TO
DISPLAY FALLING CAUSING SERIOUS PERSONAL
INJURY OR DAMAGE TO EQUIPMENT! Using screws of
improper size may damage your display. Properly sized
screws will easily and completely thread into display
mounting holes. If spacers are required, be sure to use longer
screws of the same diameter.
2. Select correct screws, spacers (if necessary) and washers
from the hardware bag (A-K) and attach brackets to back of
screen. (See Figure 4)
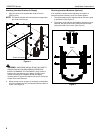
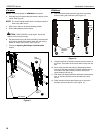
Switching Interface Brackets (Optional)
If an installation situation makes adjusting the location of
interface brackets necessary, there are several options.
1. The wall brackets may be adjusted side to side at the point
of attachment. (See Figure 5)
2. The location of the left and right interface brackets may be
switched, with the knobs on the XTM interface brackets
facing the inside of the mount. (See Figure 5)
Figure 5
Center of bracket
1
2
Knobs