


Optional Installation Steps
xiv
Cisco 1750 Router Hardware Installation Guide
78-6169-02
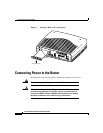
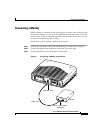
Wall-Mounting
The router can be wall-mounted using two number 6, 3/4-inch screws and the
molded mounting brackets on the bottom of the hub. You must provide the screws.
We recommend using pan-head or round-head screws.
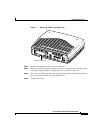
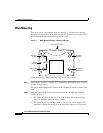
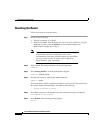
Figure 7 Wall-Mount Brackets—Bottom of Router
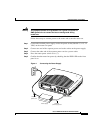
Follow these steps to mount the router on a wall or other surface:
Step 1 Install the two screws 3.75 inches (9.52 centimeters) horizontally apart on a wall
or other vertical surface.
The screws should protrude 0.25 inches (0.64 centimeters) from the surface of the
wall.
Step 2 Hang the router on the screws with either the left side or right side mounting
brackets so that
• The LEDs are visible to the user. The LEDs indicate the router operating
status, so the LEDs should be easily visible.
• The power supply does not hang from its cable. If the power supply is not
supported, it might disconnect from the cable that connects it to the router.
Front panel of router
12016
3.75"
(9.52 cm)
Mounting
bracket
Mounting
bracket
Mounting
bracket
Bottom
of router
Mounting
bracket