


6
Chapter 3: Connecting the Cable Modem
Connection Using the USB Port
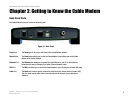
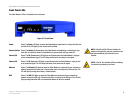
Cable Modem with USB and Ethernet Connections
Connection Using the USB Port
1. Power off your PC. If you have an existing cable modem that you are replacing, disconnect it at this time.
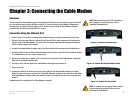
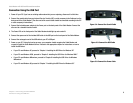
2. Connect the coaxial cable from your Internet Service Provider (ISP) or cable company to the Cable port on the
back panel of the Cable Modem. (The other end of the coaxial cable should be connected according to the ISP
or cable company’s instructions.)
3. Connect the included power adapter to the Power port on the back panel of the Cable Modem. Connect the
other end to a standard electrical outlet.
4. The Power LED on the front panel of the Cable Modem should light up and remain lit.
5. Connect the square end of the included USB cable to the USB port on the back panel of the Cable Modem.
6. Connect the rectangular end of the USB cable to your PC’s USB port.
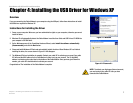
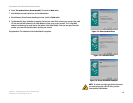
7. Power on your PC. During the boot-up process, your computer should recognize the Cable Modem and
request to install the Cable Modem’s driver. Proceed to the appropriate chapter for instructions on how to
install the USB driver.
• If your PC runs Windows XP, proceed to “Chapter 4: Installing the USB Driver for Windows XP.”
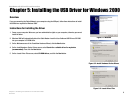
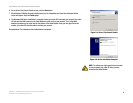
• If your PC runs Windows 2000, proceed to “Chapter 5: Installing the USB Driver for Windows 2000.”
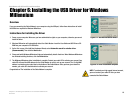
• If your PC runs Windows Millennium, proceed to “Chapter 6: Installing the USB Driver for Windows
Millennium.”
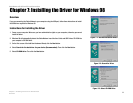
• If your PC runs Windows 98, proceed to “Chapter 7: Installing the USB Driver for Windows 98.”
Figure 3-5: Connect the USB Cable
Figure 3-4: Connect the Coaxial Cable
Figure 3-6: Connect the Power Cable