


5-46
Cisco Aironet 340, 350, and CB20A Wireless LAN Client Adapters Installation and Configuration Guide for Windows
OL-1394-08
Chapter 5 Configuring the Client Adapter
Setting Network Security Parameters
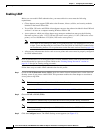
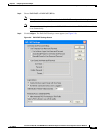
Step 10 Perform one of the following to enable manual PAC provisioning:
• From the Select a PAC Authority To Use with This Profile drop-down list, select the PAC authority
that is associated with the network defined by the profile’s SSID. The list contains the names of all
the PAC authorities from which you have previously provisioned a PAC.
• If the PAC authority drop-down list is empty or does not contain the name of a desired PAC authority,
follow these steps to import a PAC file:
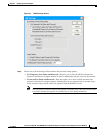
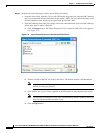
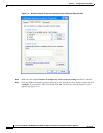
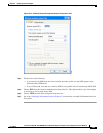
a. Click the Import button. The Import Protected Access Credentials (PAC) File screen appears
(see Figure 5-9).
Figure 5-9 Import Protected Access Credentials (PAC) File Screen
b.
Find the location of the PAC file in the Look in box. The default location is My Documents.
Note If you browse to a different location to obtain the PAC, the new location becomes the
default location going forward.
c. Click the PAC file (*.pac) so that it appears in the File name box at the bottom of the screen.
Note The filename and extension of PAC files is determined by the PAC authority that issues
them, but the standard file extension is pac.
d. Click the Open button.