


9
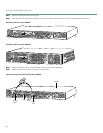
3 Install Modules
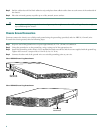
Note The information in this document applies to the Cisco AS5350, Cisco AS5400, and Cisco AS5400HPX universal
gateways.
Note Unless specifically noted, all references to the Cisco AS5400 also apply to the Cisco AS5400HPX.
Note Cisco AS5350 and Cisco AS5400 come with carrier cards and DFCs already installed. If the required dial feature cards
are already installed, proceed to the “Connect Cables” section on page 14.
For additional information about installing carrier cards and dial feature cards, refer to the Cisco AS5350 and Cisco AS5400
Universal Gateway Card Installation Guide.
You can access this document at Cisco Product Documentation > Access Servers and Access Routers > Access Servers >
Cisco AS5350 or Cisco AS5400 > Hardware Installation Documents for Cisco AS5350 or Cisco AS5400.
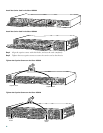
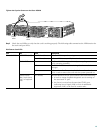
Installing Carrier Cards
Caution The carrier cards that carry the DFCs are not hot swappable. Removing a carrier card while the system is still
powered on may cause permanent damage to electronic circuits on the card.
Warning
Before opening the chassis, disconnect the telephone-network cables to avoid contact with telephone-network
voltages. To see translations of the warnings that appear in this publication, refer to the Regulatory Compliance
and Safety Information document that accompanied this device.
Warning
Do not work on the system or connect or disconnect cables during periods of lightning activity. To see translations
of the warnings that appear in this publication, refer to the Regulatory Compliance and Safety Information
document that accompanied this device.
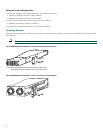
Installing a Carrier Card
If you need to install a carrier card, follow this procedure:
Step 1 Make sure the chassis is powered off.
Warning
Before working on a chassis or working near power supplies, unplug the power cord on AC units; disconnect the
power at the circuit breaker on DC units. To see translations of the warnings that appear in this publication, refer
to the Regulatory Compliance and Safety Information document that accompanied this device.
Step 2 Attach an ESD-preventive wrist strap.
Step 3 Slide the carrier card into the slot until it touches the backplane connector.