


9
Installing Hard Disk Drives in the Cisco Wide Area Application Engine 611
78-17404-01
Replacing the Cover and Bezel and Completing the Installation
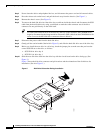
Step 11 Connect the power and SCSI cables to the drive. If you disconnected the IDE cable to the CD-ROM,
reconnect it.
Step 12 Make sure that your cables are lying flat inside the chassis, so that you do not shear them when you
replace the chassis cover.
Replacing the Cover and Bezel and Completing the Installation
Warning
This unit is intended for installation in restricted access areas. A restricted access area is where
access can only be gained by service personnel through the use of a special tool, lock and key, or
other means of security, and is controlled by the authority responsible for the location.
Statement 37
Warning
This equipment must be grounded. Never defeat the ground conductor or operate the equipment in the
absence of a suitably installed ground conductor. Contact the appropriate electrical inspection
authority or an electrician if you are uncertain that suitable grounding is available.
Statement 1024
Warning
When installing or replacing the unit, the ground connection must always be made first and
disconnected last.
Statement 1046
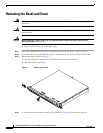
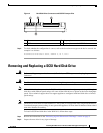
1 SCSI connector 2 Jumper pins
3 Power connector 4 Circuit board facing up
5 Drive carrier 6 Carrier handle
Warning
To prevent bodily injury when mounting or servicing this unit in a rack, you must take special
precautions to ensure that the system remains stable. The following guidelines are provided to
ensure your safety:
• This unit should be mounted at the bottom of the rack if it is the only unit in the rack.
• When mounting this unit in a partially filled rack, load the rack from the bottom to the top with the heaviest
component at the bottom of the rack.
• If the rack is provided with stabilizing devices, install the stabilizers before mounting or servicing the unit in
the rack.
Statement 1006