


2-21
Cisco 837 Router and SOHO 97 Router Hardware Installation Guide
78-14781-02
Chapter 2 Installation
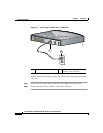
Using the Router LEDs to Check Links
Step 2 Click the Network icon to display the Network window.
Step 3 Verify that TCP/IP has been added and associated with the Ethernet adapter.
TCP/IP is shown as a cable icon in the Configuration window on Microsoft
Windows 95 and 98; it is shown as a cable icon in the Protocol window on
Microsoft Windows NT. If the icon is not visible, click Add, and add the
Microsoft TCP/IP protocol.
Step 4 To verify that the PC is configured to obtain an IP address automatically, click the
TCP/IP cable icon, and select the IP address tab in the TCP/IP Properties
window. Check Obtain an IP address from a DHCP server if it is not checked.
The IP address and Subnet mask fields should be grayed out.
Step 5 Click OK to accept all changes and exit this window. Then click OK in the
Network window.
Step 6 To reboot the PC, click Yes if you are prompted.
For more information on how to configure TCP/IP, refer to the Cisco Router Web
Setup Troubleshooting Guide, which is available on Cisco.com.
Using Cisco Router Web Setup to Configure the Router
Cisco strongly recommends that inexperienced network administrators use the
Cisco Router Web Setup application that has been installed on the router. To use
this application, complete the following steps:
Step 1 Start, or restart, one of the PCs connected to the router through Ethernet port 1,
2, 3, or 4.
Step 2 Open a web browser. Make sure that your browser is set to work in online mode.
• In Internet Explorer, click the File menu, and verify that the work offline
option is unchecked.
• In Netscape, the default selection in the File menu is set to work online.
Step 3 Enter the universal resource locator (URL) http://10.10.10.1. The CRWS home
page will appear in one or two minutes.