


w
Allow the power supply units and hard drives to cool before touching them.
w
Install the equipment near an electrical outlet for easy access.
w
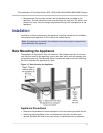
Mount equipment in a rack with sufficient airflow for safe operation.
w
For a closed or multiple-unit rack assembly, the ambient operating temperature of
the rack environment might be greater than the ambient temperature of the room.
Therefore, consider the lowest and highest operating temperatures of the
equipment when making a decision about where to install the appliance in the rack.
Rack Precautions
w
Make sure that the leveling jacks on the bottom of the rack are fully extended to
the floor, with the full weight of the rack resting on them.
w
For a single-rack installation, attach a stabilizer to the rack.
w
For a multiple-rack installation, couple (attach) the racks together.
w
Always make sure that the rack is stable before extending a component from the
rack.
w
Extend only one component at a time. Extending two or more simultaneously might
cause the rack to become unstable.
w
The handles on the left and right of the front panel of the appliance should be used
only for extending the appliance out of the rack. Do not use these handles for
mounting the appliance on the rack.
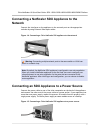
Installing Transceivers
The SDX appliances support only fiber transceivers in the 10GE ports.
Warning: Only those transceivers provided by Citrix Systems, Inc. are supported.
You must not attempt to install third-party transceivers. Doing so voids the warranty.
To install the transceiver
1. Carefully remove the transceiver from its box.
2. Align the transceiver to the front of the transceiver slot on the front panel of the
appliance.
3. Hold the transceiver between your thumb and index finger and insert it into the
transceiver slot, pressing it in until you hear the transceiver snap into place.
4. Lock the transceiver.
Quick Installation and Configuration
6