


6
2 INSTALLATION
Installation Overview
Installation is simply a matter of connecting cables to their appropriate
ports on each Master-IT PRO and each computer.
Prior to beginning the installation procedures, verify that all Master-IT
PRO KVM switches are powered OFF.
Once the configuration is completed, add consoles, cables and
computers in the following order:
1. If necessary, install the optional rack-mount kit to each Master-IT
PRO KVM switch and mount it in the rack. Then mount the cable
support bar to the back of the rack.
2. Connect the 9V DC 500mA power adapter to each Master-IT PRO
KVM switch.
3. Connect the keyboard, monitor, and mouse directly to the console
ports of the master.
4. Connect one end of each Premium 3-in-1 cable to an available PC
port on each Master-IT PRO KVM switch.
5. Connect the other end of each Premium 3-in-1 cable to each
computer. Then power ON each computer. Computers that are
already powered ON can be connected at any time.
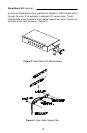
Components
Bellow is a list of components that make up a complete Master-IT PRO
configuration.
• Master-IT PRO KVM switch.
• ConnectPRO Premium 3-in-1 KVM Cables.
• A power adapter with a rating of 9V DC 500mA and polarity of
positive-on-center.
• Master-IT PRO Rack-Mount Kit. (optional)
• Master-IT Multi-Media module. (optional)