support.dell.com SAN Configurations 2-11
DELL CONFIDENTIAL - Preliminary 3/16/00
(Rev. 11/3/98) FILE LOCATION:
S:\SYSTEMS\San\San2_0\I&T_Guide\English\91WYJ_A00\91WYJc20.fm
1. For all of the following devices, unpack and install all hardware (including mount-
ing in the rack), and connect AC power and LAN cables, but do not connect any
SAN cables. Check and update all firmware levels in the following components:
For all PowerVault 50F and PowerVault 51F Fibre Channel switches, see
Chapter 5, ”Installing and Configuring PowerVault 5xF Switches.”
For all PowerVault 650/651/630F storage arrays, see Chapter 6, “Installing
and Configuring the PowerVault 650F and 651F DPEs and 630F DAE.”
For all PowerVault 120T tape autoloaders, see Chapter 8, “Installing and Con-
figuring the PowerVault 130T Tape Library/120T Autoloader.”
For all PowerVault 130T tape libraries, see Chapter 8, “Installing and Config-
uring the PowerVault 130T Tape Library/120T Autoloader.”
For all PowerVault 35F Fibre Channel bridges, see Chapter 7, “Installing and
Configuring the PowerVault 35F Fibre Channel Multiport Bridge.”
2. For all servers, perform the following functions:
a. Unpack and install all hardware (including mounting in the rack), and connect
AC power, but do not connect any LAN or SAN cables. For instructions, see
the server documentation.
b. Install the operating system. For instructions, see the operating system
documentation.
c. Install all Fibre Channel HBAs. For instructions, see Chapter 4, “Installing the
Host Bus Adapter in the Server.”
d. Install QLogic drivers and BIOS, and set the execution throttle and LUNs per
target. For instructions, see Chapter 4, “Installing the Host Bus Adapter in
the Server.”
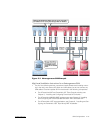
3. Connect all SAN cables.
a. Connect all SAN inter-switch link (ISL) cables.
b. Connect all servers.
c. Connect all storage array(s).
d. Connect all bridge(s).


