


Replacing the System Board
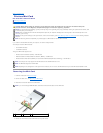
1. Replace the system board in the computer base.
2. Connect the eSATA connector cable, AC adapter connector cable, and TV tuner card cable to the respective system board connectors.
3. Replace the three screws that secure the system board to the computer base.
4. Place the right power/battery light cable, left power/battery light cable, display cable, and camera cable in the routing guides and connect them to the
respective system board connectors (see Replacing the Display Assembly).
5. Replace the audio board (see Replacing the Audio Board).
6. Replace the subwoofer (see Replacing the Subwoofer).
7. Replace the IEEE 1394 module (see Replacing the IEEE 1394 Module).
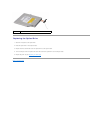
8. Replace the optical drive (see Replacing the Optical Drive).
9. Replace the palm rest (see Replacing the Palm Rest).
10. Replace the Mini-Cards, if any (see Replacing the Mini-Card).
11. Replace the coin-cell battery (see Replacing the Coin-Cell Battery).
12. Replace the thermal fan (see Replacing the Thermal Fan).
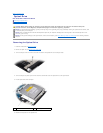
13. Peel the backing off the new thermal cooling pads in the kit and adhere the pads to the portions of the processor heat sink that cover the central
processor unit and the graphic processor unit.
14. Replace the processor heat sink (see Replacing the Processor Heat Sink).
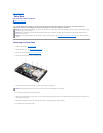
15. Replace the memory module(s) (see Replacing the Memory Module(s)).
16. Replace the hard drive (see Replacing the Hard Drive).
17. Replace the rear caps (see Replacing the Rear Caps).
18. Replace the base cover (see Replacing the Base Cover).
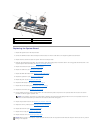
1
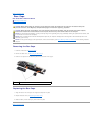
system board
2
screws (3)
3
eSATA connector cable connector
4
AC adapter connector cable connector
5
computer base
6
TV tuner card cable connector
NOTE: If the processor, thermal fan, or system board is replaced, use the thermal cooling pads provided in the kit on the processor heat sink to
ensure that thermal conductivity is achieved. Do not reuse the old thermal cooling pads.
NOTICE: Before turning on the computer, replace all screws and ensure that no stray screws remain inside the computer. Failure to do so may result in
damage to the computer.