


Removing the Power-Supply Unit | 35
12
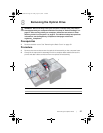
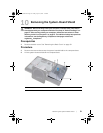
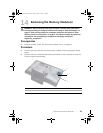
Removing the Power-Supply Unit
WARNING: Before working inside your computer, read the safety information
that shipped with your computer and follow the steps in "Before You Begin" on
page 11. After working inside your computer, follow the instructions in "After
Working Inside Your Computer" on page 13. For additional safety best practices
information, see the Regulatory Compliance Homepage at dell.com/
regulatory_compliance.
Prerequisites
1 Remove the back cover. See "Removing the Back Cover" on page 19.
2 Remove the stand. See "Removing the Stand" on page 47.
3 Remove the system-board shield. See "Removing the System-Board Shield" on
page 31.
4 Remove the trim cover. See "Removing the Trim Cover" on page 87.
5 Remove the I/O panel. See "Removing the I/O Panel" on page 91.
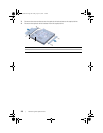
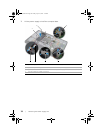
Procedure
1 Press the securing clips and disconnect the main and processor power-supply
cables from the system board.
2 Remove the main and processor power-supply cables from their routing guides.
3 Press the securing clip on the power-port cable connector and disconnect the
power-port cable from the power-supply unit.
4 Disconnect the power-supply indicator cable from the power-supply unit.
5 Lift the securing clip and disconnect the power-supply fan cable from the
power-supply unit.
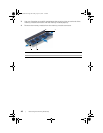
6 Remove the screws that secure the power-supply unit to the computer base.
OM_Book.book Page 35 Friday, April 27, 2012 3:23 PM