


2 Dell PowerEdge 6300 and 4300 Systems 1 x 2 Backplane Installation Information
For proper use of the 1 x 2 backplane, the minimum BIOS revision level for the 6300
system is A06, and the minimum BIOS revision level for the 4300 system is A05. To
ensure that you have the minimum firmware for the 1 x 2 backplane for both systems,
run the SMFLASH utility A33 on your system.
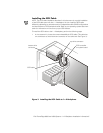
Before you install the 1 x 2 backplane, prepare the peripheral drive bay for installation.
To remove or install drives in the peripheral drive bay, you must remove the computer
cover and front bezel according to the instructions in Removing and Replacing the
Computer Cover in Chapter 7 of the
Installation and Troubleshooting Guide
.
5HPRYLQJDQG5HSODFLQJ)URQW3DQHO,QVHUWV
To protect the inside of the computer from foreign particles, a plastic front-panel
insert covers each empty peripheral drive bay. Before you install a drive in an empty
peripheral drive bay, you must first remove the front-panel insert.
Whenever you remove a drive, be sure to replace the front-panel insert over the
empty peripheral drive bay.
To remove the front-panel insert for a peripheral drive bay that you intend to use, first
remove the front bezel. Then, facing the inside of the front bezel, press against the
center of the insert with your thumbs until the insert bows sufficiently to loosen the
tabs on the sides of the insert. Pull the insert out of the bezel.
To replace a front-panel insert, position the insert over the peripheral drive bay
opening from the inside of the front bezel and carefully press the insert into place. A
tab on each side of the insert snaps into a corresponding latch on the inside of the
front bezel.
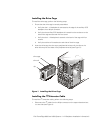
If you have any peripheral devices in the bottom two slots of the peripheral drive bay,
remove them before installing the 1 x 2 backplane. To remove an existing peripheral
device (such as a CD-ROM drive or a tape drive) from the peripheral drive bay, perform
the following steps:
1. Remove the system cover and the front bezel.
2. Locate the plastic clips attached to the drive rails that are on each side of the
peripheral device that you want to remove.
3. Squeeze the clips inward toward the device until the clips disengage from the
sides of the peripheral bay.
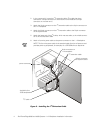
4. Pull the peripheral device outward until the device clears the peripheral bay.
5. Unplug the data cable and power cord from the back of the peripheral device. Do
not pull hard on the peripheral device when removing it from the system because
the cord and cable connections in the system may become loose or damaged.
NOTE: If a cord or cable prevents the removal of a peripheral device from the
system, unplug the cord or cable from the back of the peripheral device while it is
still in the peripheral bay.