


System Board 71
4
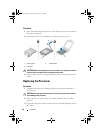
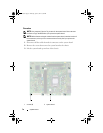
Compare the system board that you removed with the replacement system
board to ensure that they are identical.
NOTE: Some components and connectors on the replacement system board
may be in different locations compared to the components and connectors on
the existing system board.
NOTE: Jumper settings on the replacement system board is preset at the
factory.
Replacing the System Board
Procedure
1
Gently place the system board into the chassis and slide it toward the back
of the computer.
2
Replace the screws that secure the system board to the chassis.
3
Route and connect the cables that you disconnected from the connectors
on the system board.
NOTE: For information on system board connectors, see "System Board
Components" on page 15.
Postrequisites
1
Replace the processor. See "Replacing the Processor" on page 64.
2
Replace the front bezel. See "Replacing the Front Bezel" on page 35.
3
Replace the fan shroud. See "Replacing the Fan Shroud" on page 20.
4
Replace the processor fan and heat-sink assembly. See "Replacing the
Processor Fan and Heat-Sink Assembly" on page 61.
5
Replace any PCI-Express cards, if applicable. See "Replacing the PCI-
Express Cards" on page 27.
6
Replace the Mini-Card, if applicable. See "Replacing the Mini-Card" on
page 31.
7
Replace the memory module(s). See "Replacing Memory Module(s)" on
page 23.
8
Replace the drive cage. See "Replacing the Drive Cage" on page 39.
book.book Page 71 Thursday, April 5, 2012 5:38 PM