


Maintenance 31
NOTICE: Do
not
touch the gold contact area on the cartridges.
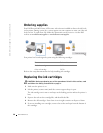
6 Insert the new cartridges. Make sure the color ink cartridge is secure in the left carrier
and the black cartridge is secure in the right carrier, and then snap the lids closed.
7 Lift the printer (scanner unit) and push the scanner support back while lowering the
printer (scanner unit) until it is closed.
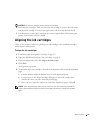
Aligning the ink cartridges
There are two instances when you will align your ink cartridges: after installing cartridges
and to improve print quality.
To align the ink cartridges:
1 Load plain paper in the printer. For help, see page 12.
2 Open the Dell Printer Solution Center. For help, see page 8.
3 From the Maintenance tab, click Align to fix blurry edges.
4 Click Print.
An alignment page prints.
5 To manually align your cartridges, select the best alignment values from the alignment
page.
a Find the number under the darkest arrow for each alignment group.
b Use the arrows in the Align Cartridges dialog box to select the number that
matches the arrow you chose from the printed page.
c Once you have selected a number for each of the alignment groups, click OK.
NOTE: If the alignment page does not print, make sure you have completely removed the
stickers and transparent tape from both ink cartridges, and then try to align the cartridges
again.