


Connecting the printer to a wireless network using the printer software
Notes:
• Make sure your printer is turned on.
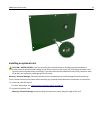
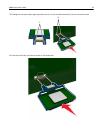
• Make sure the wireless network adapter installed in your printer is working properly. For information on
installing the wireless network adapter, see the instruction sheet that came with the adapter.
Using the Wireless Setup Utility (Windows only)
1 Check if the printer software is already installed.
2 Use the search command on the Start menu to locate Printer Home.
3 Open Printer Home, and then click Settings > Wireless Setup Utility.
4 Follow the steps on the computer screen.
Using the Wireless Setup Assistant (Macintosh only)
The Wireless Setup Assistant lets you:
• Configure the printer to join an existing wireless network.
• Add a printer to an existing ad hoc network.
• Change the wireless settings after installation.
• Install the printer on additional network computers.
Installing the Wireless Setup Assistant
1 Go to the Dell support Web site at www.dell.com/support/printers.
2 Download the latest Wireless Setup Assistant application.
3 Double‑click the downloaded software installer package.
4 Follow the instructions on the computer screen.
Launching the Wireless Setup Assistant
Notes:
• Make sure the printer is turned on.
• Make sure a wireless network adapter is installed in your printer and is working properly.
1 From the Finder, navigate to:
Applications > select your printer folder
2 Double‑click Wireless Setup Assistant, and then follow the instructions on the computer screen.
Note: If you encounter problems while running the application, then click
?
.
Additional printer setup 23