


Removing and Replacing Parts 53
1 Remove the hard drive.
2 Remove the keyboard assembly.
3 Remove the display assembly.
4 Remove the palmrest assembly.
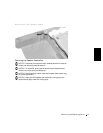
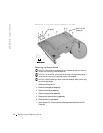
5 Disconnect the speaker interface cable connectors.
NOTICE: Do not pull the antenna cable when removing the speaker (see
“Speaker Assemblies”).
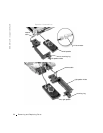
6
Remove the speaker assemblies by pulling them straight up and out of
the bottom case assembly
NOTICE: Handle the speaker assemblies and speakers with care to avoid
damaging the speaker cones.
NOTE: The left speaker has an in-line connector, and its cable is longer
than the right speaker.
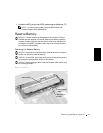
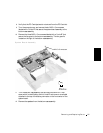
Replacing the Speaker Assembly
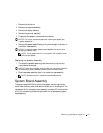
1 To replace the speaker assembly, place the mounting ring over the
front palmrest screw post.
NOTICE: Make sure the speaker wires are under their routing clips. Route the
left speaker wire properly between the battery bay and hard drive area.
2
Slide the speaker assembly down in to the bottom case assembly.
NOTE: Speakers face out in the bottom case assembly holders.
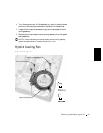
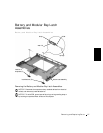
System Board Assembly
The system board’s BIOS chip contains the system’s service tag number,
which is also visible on a bar-code label on the bottom of the computer. The
replacement kit for the system board assembly includes a CD that provides
a utility for transferring the service tag number to the replacement system
board assembly.