


v
Recommended Tools. . . . . . . . . . . . . . . . . . . . . . . . . . . . . . . . . . . . . . . . . . . . 2
Preparing to Work Inside Your Computer . . . . . . . . . . . . . . . . . . . . . . . . . . . . 2
Before Working Inside Your Computer . . . . . . . . . . . . . . . . . . . . . . . . 2
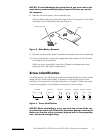
Screw Identification . . . . . . . . . . . . . . . . . . . . . . . . . . . . . . . . . . . . . . . . . . . . . 3
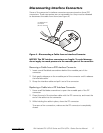
Disconnecting Interface Connectors . . . . . . . . . . . . . . . . . . . . . . . . . . . . . . . . 5
Removing a Cable from a ZIF Interface Connector . . . . . . . . . . . . . . . 5
Replacing a Cable into a ZIF Interface Connector . . . . . . . . . . . . . . . . 5
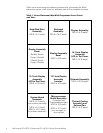
Field-Replaceable Parts and Assemblies . . . . . . . . . . . . . . . . . . . . . . . . . . . . 6
Removing and Replacing Field-Replaceable Parts and Assemblies . . . . . . . 10
Hard-Disk Drive Assembly . . . . . . . . . . . . . . . . . . . . . . . . . . . . . . . . . . . . 11
Removing the Hard-Disk Drive Assembly . . . . . . . . . . . . . . . . . . . . . 11
Replacing the Hard-Disk Drive Assembly . . . . . . . . . . . . . . . . . . . . . 11
Modular Bay Devices (Diskette Drive, CD-ROM Drive, DVD-ROM Drive,
CD-RW Drive, SuperDisk LS-120 Drive, Battery, or Travel Module) . . . . 12
Memory Module Cover . . . . . . . . . . . . . . . . . . . . . . . . . . . . . . . . . . . . . . 12
Removing the Memory Module Cover . . . . . . . . . . . . . . . . . . . . . . . 12
Memory Modules . . . . . . . . . . . . . . . . . . . . . . . . . . . . . . . . . . . . . . . . . . 13
Removing the Memory Modules . . . . . . . . . . . . . . . . . . . . . . . . . . . . 13
Replacing the Memory Modules . . . . . . . . . . . . . . . . . . . . . . . . . . . . 13
Keyboard Assembly . . . . . . . . . . . . . . . . . . . . . . . . . . . . . . . . . . . . . . . . . 14
Removing the Keyboard Assembly . . . . . . . . . . . . . . . . . . . . . . . . . . 14
Replacing the Keyboard Assembly . . . . . . . . . . . . . . . . . . . . . . . . . . 16
Microprocessor Module. . . . . . . . . . . . . . . . . . . . . . . . . . . . . . . . . . . . . . 18
Removing the Microprocessor Module . . . . . . . . . . . . . . . . . . . . . . . 18
Replacing the Microprocessor Module . . . . . . . . . . . . . . . . . . . . . . . 19
Display Assembly . . . . . . . . . . . . . . . . . . . . . . . . . . . . . . . . . . . . . . . . . . 20
Removing the Display Assembly . . . . . . . . . . . . . . . . . . . . . . . . . . . . 20
14.1-Inch Display Assembly Bezel and LCD Panel . . . . . . . . . . . . . . . . . 21
Removing the 14.1-Inch Display Assembly Bezel . . . . . . . . . . . . . . . 21
Removing the14.1-Inch LCD Panel . . . . . . . . . . . . . . . . . . . . . . . . . . 22
Removing the 14.1-Inch LCD Flex Cable . . . . . . . . . . . . . . . . . . . . . . 22
Replacing the 14.1-Inch LCD Flex Cable . . . . . . . . . . . . . . . . . . . . . . 23
Replacing the 14.1-Inch LCD Panel . . . . . . . . . . . . . . . . . . . . . . . . . . 24