


1
2
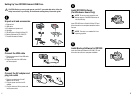
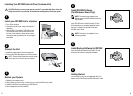
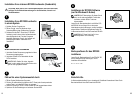
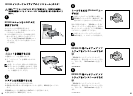
Unpack unit and accessories
1
Setting Up Your PowerVault
™
RD1000
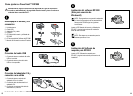
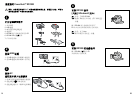
Connect the USB cable
2
Setting Up Your
PowerVault
™
RD1000
1
2
3
4
5 6
1
2
7
1 - Unité externe
2 - Câble USB
3 - Adaptateur CA et câble d’alimentation
4 - Cartouche
5 - DC « Guide de l’utilisateur et utilités RD1000
6 - DC « Logiciel de sauvegarde pour RD1000 »
7 - Guide d’information du produit
1 - externes Laufwerk
2 - USB-Kabel
3 - AC-Netzteil und Netzkabel
4 - Cartridge
5 - RD1000 „Benutzerhandbuch und Utilities”-CD
6 - CD mit Backupsoftware für das RD1000
7 - Produktinformation
1 - Unidad externa
2 - Cable USB
3 - Adaptador CA y cable
4 - Cartucho
5 - CD “Manual del usuario y utilidades de RD1000”
6 - CD de respaldo del Software de RD1000
7 - Manual de Información sobre el Producto
1 -
2 - USB
3 - AC
4 -
5 - RD1000 CD
6 - RD1000 CD
7 -
1 - 외부 장치
2 - USB 케이블
3 - AC 어댑터 및 전원 코드
4 - 카트리지
5 - RD1000 사용자 가이드 및 유틸리티 CD
6 - RD1000 CD용 백업 소프트웨어
7 - 제품 정보 가이드
1 -
2 - USB
3 - AC
4 -
5 - RD1000 CD
6 - RD1000 CD
7 -
ADVERTENCIA: Antes de realizar la instalación y poner a funcionar su unidad
de disco removible, siga las instrucciones de seguridad de su Manual de
Información. sobre el Producto.
1 - External unit
2 - USB cable
3 - AC adapter and power cord
4 - Cartridge
5 - RD1000 User’s Guide & Utilities CD
6 - Backup Software for RD1000 CD
7 - Product Information Guide
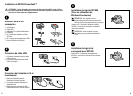
1 - Plug the square end of the USB cable into the drive.
2 - Plug the flat end of the USB cable into the computer.
1 - Connectez l’extrémité carrée du câble USB au lecteur.
2 - Connectez l’extrémité plate du câble USB à l’ordinateur.
1 - Stecken Sie das rechteckige Ende des USB-Kabels in das Laufwerk.
2 - Stecken Sie das flache Ende des USB-Kabels in den Computer.
1 - Conecte el extremo cuadrado del cable USB en la unidad.
2 - Conecte el extremo plano del cable USB en el computador.
1 - USB 케이블의 사각형 끝부분을 드라이브에 연결합니다.
2 - USB 케이블의 평평한 끝부분을 컴퓨터에 연결합니다.
1 - USB
2 - USB
1 - USB
2 - USB
CAUTION: Before you set up and operate your Dell™ removable disk drive,
follow the safety instructions in your Product Information Guide.
ATTENTION : Avant d’installer et d’utiliser le disque dur amovible Dell™,
veuillez lire les instructions de sécurité dans le Guide d’informations du
produit.
VORSICHT: Befolgen Sie vor dem Einrichten und dem Betrieb Ihres Dell™
Wechselplattenlaufwerks die Sicherheitshinweise in der Produktinformation.
Copyright text goes
Installation de RD1000 PowerVault™
Einrichtung Ihres PowerVault™ RD1000
Cómo ajustar su PowerVault™ RD1000
PowerVault™ RD1000 설정
PowerVault™ RD1000
PowerVault™ RD1000
Déballez l’unité et les accessoires
Nehmen Sie Laufwerk und Zubehör aus der Verpackung
Desempaque la unidad y los accesorios
장치 및 액세서리 포장 풀기
주의: Dell™ 이동식 디스크 드라이브를 설정 및 작동하기 전에 제품
정보 가이드에 있는 안전 지침을 준수하십시오.
: Dell™ ,
Dell™
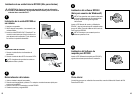
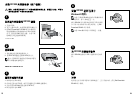
Connect the AC adapter and plug into outlet
3
2
3
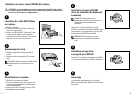
1 - Plug the rounded end of the AC adapter into the drive.
2 - Plug the power cord into the AC adapter.
3 - Plug the other end of the power cord into a power outlet.
1 - Branchez l’extrémité ronde de l’adaptateur CA dans le lecteur.
2 - Connectez le câble d’alimentation à l’adaptateur CA.
3 - Branchez l’autre extrémité du câble d’alimentation dans la prise de courant.
1 - Stecken Sie den runden Stecker des Netzteils in das Laufwerk.
2 - Stecken Sie das Netzkabel in das Netzteil.
3 - Stecken Sie die andere Seite des Netzkabels in eine Steckdose.
1 - Conecte el extremo redondo del adaptador AC en la unidad.
2 - Conecte el cable de alimentación al adaptador CA.
3 - Conecte el otro extremo del cable de alimentación a punto de
1 - AC 어댑터의 둥근 끝부분을 드라이브에 연결합니다.
2 - 전원 코드를 AC 어댑터에 연결합니다.
3 - 전원 코드의 반대쪽 부분을 전원 콘센트에 연결합니다.
1 - AC
2 - AC
3 -
1 - AC
2 - AC
3 -
1
Connexion du câble USB
Anschließen des USB-Kabels
Conexión del cable USB
USB 케이블 연결
USB
USB
Connexion de l’adaptateur CA et branchement
Verbinden des Netzteils mit dem Laufwerk und einer Steckdose
Conexión del adaptador CA y conexión a una salida
AC
AC 어댑터 연결 및 콘센트에 연결
AC
Dell PN CT198 REV A00
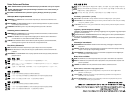
Unpack unit and accessories
1
Setting Up Your PowerVault
™
RD1000
Connect the USB cable
2
Setting Up Your
PowerVault
™
RD1000
1
2
3
4
5 6
1
2
7
1 - Unité externe
2 - Câble USB
3 - Adaptateur CA et câble d’alimentation
4 - Cartouche
5 - DC « Guide de l’utilisateur et utilités RD1000
6 - DC « Logiciel de sauvegarde pour RD1000 »
7 - Guide d’information du produit
1 - externes Laufwerk
2 - USB-Kabel
3 - AC-Netzteil und Netzkabel
4 - Cartridge
5 - RD1000 „Benutzerhandbuch und Utilities”-CD
6 - CD mit Backupsoftware für das RD1000
7 - Produktinformation
1 - Unidad externa
2 - Cable USB
3 - Adaptador CA y cable
4 - Cartucho
5 - CD “Manual del usuario y utilidades de RD1000”
6 - CD de respaldo del Software de RD1000
7 - Manual de Información sobre el Producto
1 -
2 - USB
3 - AC
4 -
5 - RD1000 CD
6 - RD1000 CD
7 -
1 - 외부 장치
2 - USB 케이블
3 - AC 어댑터 및 전원 코드
4 - 카트리지
5 - RD1000 사용자 가이드 및 유틸리티 CD
6 - RD1000 CD용 백업 소프트웨어
7 - 제품 정보 가이드
1 -
2 - USB
3 - AC
4 -
5 - RD1000 CD
6 - RD1000 CD
7 -
ADVERTENCIA: Antes de realizar la instalación y poner a funcionar su unidad
de disco removible, siga las instrucciones de seguridad de su Manual de
Información. sobre el Producto.
1 - External unit
2 - USB cable
3 - AC adapter and power cord
4 - Cartridge
5 - RD1000 User’s Guide & Utilities CD
6 - Backup Software for RD1000 CD
7 - Product Information Guide
1 - Plug the square end of the USB cable into the drive.
2 - Plug the flat end of the USB cable into the computer.
1 - Connectez l’extrémité carrée du câble USB au lecteur.
2 - Connectez l’extrémité plate du câble USB à l’ordinateur.
1 - Stecken Sie das rechteckige Ende des USB-Kabels in das Laufwerk.
2 - Stecken Sie das flache Ende des USB-Kabels in den Computer.
1 - Conecte el extremo cuadrado del cable USB en la unidad.
2 - Conecte el extremo plano del cable USB en el computador.
1 - USB 케이블의 사각형 끝부분을 드라이브에 연결합니다.
2 - USB 케이블의 평평한 끝부분을 컴퓨터에 연결합니다.
1 - USB
2 - USB
1 - USB
2 - USB
CAUTION: Before you set up and operate your Dell™ removable disk drive,
follow the safety instructions in your Product Information Guide.
ATTENTION : Avant d’installer et d’utiliser le disque dur amovible Dell™,
veuillez lire les instructions de sécurité dans le Guide d’informations du
produit.
VORSICHT: Befolgen Sie vor dem Einrichten und dem Betrieb Ihres Dell™
Wechselplattenlaufwerks die Sicherheitshinweise in der Produktinformation.
Copyright text goes
Installation de RD1000 PowerVault™
Einrichtung Ihres PowerVault™ RD1000
Cómo ajustar su PowerVault™ RD1000
PowerVault™ RD1000 설정
PowerVault™ RD1000
PowerVault™ RD1000
Déballez l’unité et les accessoires
Nehmen Sie Laufwerk und Zubehör aus der Verpackung
Desempaque la unidad y los accesorios
장치 및 액세서리 포장 풀기
주의: Dell™ 이동식 디스크 드라이브를 설정 및 작동하기 전에 제품
정보 가이드에 있는 안전 지침을 준수하십시오.
: Dell™ ,
Dell™
Connect the AC adapter and plug into outlet
3
2
3
1 - Plug the rounded end of the AC adapter into the drive.
2 - Plug the power cord into the AC adapter.
3 - Plug the other end of the power cord into a power outlet.
1 - Branchez l’extrémité ronde de l’adaptateur CA dans le lecteur.
2 - Connectez le câble d’alimentation à l’adaptateur CA.
3 - Branchez l’autre extrémité du câble d’alimentation dans la prise de courant.
1 - Stecken Sie den runden Stecker des Netzteils in das Laufwerk.
2 - Stecken Sie das Netzkabel in das Netzteil.
3 - Stecken Sie die andere Seite des Netzkabels in eine Steckdose.
1 - Conecte el extremo redondo del adaptador AC en la unidad.
2 - Conecte el cable de alimentación al adaptador CA.
3 - Conecte el otro extremo del cable de alimentación a punto de
1 - AC 어댑터의 둥근 끝부분을 드라이브에 연결합니다.
2 - 전원 코드를 AC 어댑터에 연결합니다.
3 - 전원 코드의 반대쪽 부분을 전원 콘센트에 연결합니다.
1 - AC
2 - AC
3 -
1 - AC
2 - AC
3 -
1
Connexion du câble USB
Anschließen des USB-Kabels
Conexión del cable USB
USB 케이블 연결
USB
USB
Connexion de l’adaptateur CA et branchement
Verbinden des Netzteils mit dem Laufwerk und einer Steckdose
Conexión del adaptador CA y conexión a una salida
AC
AC 어댑터 연결 및 콘센트에 연결
AC
Dell PN CT198 REV A00
Unpack unit and accessories
1- External unit
2- USB cable
3- AC adapter and power cord
4- Cartridge
5- RD1000 User’s Guide & Utilities CD
6- Backup Software for RD 1000 CD
7- Product Information Guides
Connect the USB cable
1- Plug the square end of the USB cable
into the drive.
2- Plug the flat end of the USB cable
into the computer.
Connect the AC adapter and
plug into outlet
1- Plug the rounded end of the AC
adapter into the drive.
2 - Plug the power cord into the AC
adapter
3 - Plug the other end of the power cord
into a power outlet.
Unpack unit and accessories
1
Setting Up Your PowerVault
™
RD1000
Connect the USB cable
2
Setting Up Your
PowerVault
™
RD1000
1
2
3
4
5 6
1
2
7
1 - Unité externe
2 - Câble USB
3 - Adaptateur CA et câble d’alimentation
4 - Cartouche
5 - DC « Guide de l’utilisateur et utilités RD1000
6 - DC « Logiciel de sauvegarde pour RD1000 »
7 - Guide d’information du produit
1 - externes Laufwerk
2 - USB-Kabel
3 - AC-Netzteil und Netzkabel
4 - Cartridge
5 - RD1000 „Benutzerhandbuch und Utilities”-CD
6 - CD mit Backupsoftware für das RD1000
7 - Produktinformation
1 - Unidad externa
2 - Cable USB
3 - Adaptador CA y cable
4 - Cartucho
5 - CD “Manual del usuario y utilidades de RD1000”
6 - CD de respaldo del Software de RD1000
7 - Manual de Información sobre el Producto
1 -
2 - USB
3 - AC
4 -
5 - RD1000 CD
6 - RD1000 CD
7 -
1 - 외부 장치
2 - USB 케이블
3 - AC 어댑터 및 전원 코드
4 - 카트리지
5 - RD1000 사용자 가이드 및 유틸리티 CD
6 - RD1000 CD용 백업 소프트웨어
7 - 제품 정보 가이드
1 -
2 - USB
3 - AC
4 -
5 - RD1000 CD
6 - RD1000 CD
7 -
ADVERTENCIA: Antes de realizar la instalación y poner a funcionar su unidad
de disco removible, siga las instrucciones de seguridad de su Manual de
Información. sobre el Producto.
1 - External unit
2 - USB cable
3 - AC adapter and power cord
4 - Cartridge
5 - RD1000 User’s Guide & Utilities CD
6 - Backup Software for RD1000 CD
7 - Product Information Guide
1 - Plug the square end of the USB cable into the drive.
2 - Plug the flat end of the USB cable into the computer.
1 - Connectez l’extrémité carrée du câble USB au lecteur.
2 - Connectez l’extrémité plate du câble USB à l’ordinateur.
1 - Stecken Sie das rechteckige Ende des USB-Kabels in das Laufwerk.
2 - Stecken Sie das flache Ende des USB-Kabels in den Computer.
1 - Conecte el extremo cuadrado del cable USB en la unidad.
2 - Conecte el extremo plano del cable USB en el computador.
1 - USB 케이블의 사각형 끝부분을 드라이브에 연결합니다.
2 - USB 케이블의 평평한 끝부분을 컴퓨터에 연결합니다.
1 - USB
2 - USB
1 - USB
2 - USB
CAUTION: Before you set up and operate your Dell™ removable disk drive,
follow the safety instructions in your Product Information Guide.
ATTENTION : Avant d’installer et d’utiliser le disque dur amovible Dell™,
veuillez lire les instructions de sécurité dans le Guide d’informations du
produit.
VORSICHT: Befolgen Sie vor dem Einrichten und dem Betrieb Ihres Dell™
Wechselplattenlaufwerks die Sicherheitshinweise in der Produktinformation.
Copyright text goes
Installation de RD1000 PowerVault™
Einrichtung Ihres PowerVault™ RD1000
Cómo ajustar su PowerVault™ RD1000
PowerVault™ RD1000 설정
PowerVault™ RD1000
PowerVault™ RD1000
Déballez l’unité et les accessoires
Nehmen Sie Laufwerk und Zubehör aus der Verpackung
Desempaque la unidad y los accesorios
장치 및 액세서리 포장 풀기
주의: Dell™ 이동식 디스크 드라이브를 설정 및 작동하기 전에 제품
정보 가이드에 있는 안전 지침을 준수하십시오.
: Dell™ ,
Dell™
Connect the AC adapter and plug into outlet
3
2
3
1 - Plug the rounded end of the AC adapter into the drive.
2 - Plug the power cord into the AC adapter.
3 - Plug the other end of the power cord into a power outlet.
1 - Branchez l’extrémité ronde de l’adaptateur CA dans le lecteur.
2 - Connectez le câble d’alimentation à l’adaptateur CA.
3 - Branchez l’autre extrémité du câble d’alimentation dans la prise de courant.
1 - Stecken Sie den runden Stecker des Netzteils in das Laufwerk.
2 - Stecken Sie das Netzkabel in das Netzteil.
3 - Stecken Sie die andere Seite des Netzkabels in eine Steckdose.
1 - Conecte el extremo redondo del adaptador AC en la unidad.
2 - Conecte el cable de alimentación al adaptador CA.
3 - Conecte el otro extremo del cable de alimentación a punto de
1 - AC 어댑터의 둥근 끝부분을 드라이브에 연결합니다.
2 - 전원 코드를 AC 어댑터에 연결합니다.
3 - 전원 코드의 반대쪽 부분을 전원 콘센트에 연결합니다.
1 - AC
2 - AC
3 -
1 - AC
2 - AC
3 -
1
Connexion du câble USB
Anschließen des USB-Kabels
Conexión del cable USB
USB 케이블 연결
USB
USB
Connexion de l’adaptateur CA et branchement
Verbinden des Netzteils mit dem Laufwerk und einer Steckdose
Conexión del adaptador CA y conexión a una salida
AC
AC 어댑터 연결 및 콘센트에 연결
AC
Dell PN CT198 REV A00
Unpack unit and accessories
1
Setting Up Your PowerVault
™
RD1000
Connect the USB cable
2
Setting Up Your
PowerVault
™
RD1000
1
2
3
4
5 6
1
2
7
1 - Unité externe
2 - Câble USB
3 - Adaptateur CA et câble d’alimentation
4 - Cartouche
5 - DC « Guide de l’utilisateur et utilités RD1000
6 - DC « Logiciel de sauvegarde pour RD1000 »
7 - Guide d’information du produit
1 - externes Laufwerk
2 - USB-Kabel
3 - AC-Netzteil und Netzkabel
4 - Cartridge
5 - RD1000 „Benutzerhandbuch und Utilities”-CD
6 - CD mit Backupsoftware für das RD1000
7 - Produktinformation
1 - Unidad externa
2 - Cable USB
3 - Adaptador CA y cable
4 - Cartucho
5 - CD “Manual del usuario y utilidades de RD1000”
6 - CD de respaldo del Software de RD1000
7 - Manual de Información sobre el Producto
1 -
2 - USB
3 - AC
4 -
5 - RD1000 CD
6 - RD1000 CD
7 -
1 - 외부 장치
2 - USB 케이블
3 - AC 어댑터 및 전원 코드
4 - 카트리지
5 - RD1000 사용자 가이드 및 유틸리티 CD
6 - RD1000 CD용 백업 소프트웨어
7 - 제품 정보 가이드
1 -
2 - USB
3 - AC
4 -
5 - RD1000 CD
6 - RD1000 CD
7 -
ADVERTENCIA: Antes de realizar la instalación y poner a funcionar su unidad
de disco removible, siga las instrucciones de seguridad de su Manual de
Información. sobre el Producto.
1 - External unit
2 - USB cable
3 - AC adapter and power cord
4 - Cartridge
5 - RD1000 User’s Guide & Utilities CD
6 - Backup Software for RD1000 CD
7 - Product Information Guide
1 - Plug the square end of the USB cable into the drive.
2 - Plug the flat end of the USB cable into the computer.
1 - Connectez l’extrémité carrée du câble USB au lecteur.
2 - Connectez l’extrémité plate du câble USB à l’ordinateur.
1 - Stecken Sie das rechteckige Ende des USB-Kabels in das Laufwerk.
2 - Stecken Sie das flache Ende des USB-Kabels in den Computer.
1 - Conecte el extremo cuadrado del cable USB en la unidad.
2 - Conecte el extremo plano del cable USB en el computador.
1 - USB 케이블의 사각형 끝부분을 드라이브에 연결합니다.
2 - USB 케이블의 평평한 끝부분을 컴퓨터에 연결합니다.
1 - USB
2 - USB
1 - USB
2 - USB
CAUTION: Before you set up and operate your Dell™ removable disk drive,
follow the safety instructions in your Product Information Guide.
ATTENTION : Avant d’installer et d’utiliser le disque dur amovible Dell™,
veuillez lire les instructions de sécurité dans le Guide d’informations du
produit.
VORSICHT: Befolgen Sie vor dem Einrichten und dem Betrieb Ihres Dell™
Wechselplattenlaufwerks die Sicherheitshinweise in der Produktinformation.
Copyright text goes
Installation de RD1000 PowerVault™
Einrichtung Ihres PowerVault™ RD1000
Cómo ajustar su PowerVault™ RD1000
PowerVault™ RD1000 설정
PowerVault™ RD1000
PowerVault™ RD1000
Déballez l’unité et les accessoires
Nehmen Sie Laufwerk und Zubehör aus der Verpackung
Desempaque la unidad y los accesorios
장치 및 액세서리 포장 풀기
주의: Dell™ 이동식 디스크 드라이브를 설정 및 작동하기 전에 제품
정보 가이드에 있는 안전 지침을 준수하십시오.
: Dell™ ,
Dell™
Connect the AC adapter and plug into outlet
3
2
3
1 - Plug the rounded end of the AC adapter into the drive.
2 - Plug the power cord into the AC adapter.
3 - Plug the other end of the power cord into a power outlet.
1 - Branchez l’extrémité ronde de l’adaptateur CA dans le lecteur.
2 - Connectez le câble d’alimentation à l’adaptateur CA.
3 - Branchez l’autre extrémité du câble d’alimentation dans la prise de courant.
1 - Stecken Sie den runden Stecker des Netzteils in das Laufwerk.
2 - Stecken Sie das Netzkabel in das Netzteil.
3 - Stecken Sie die andere Seite des Netzkabels in eine Steckdose.
1 - Conecte el extremo redondo del adaptador AC en la unidad.
2 - Conecte el cable de alimentación al adaptador CA.
3 - Conecte el otro extremo del cable de alimentación a punto de
1 - AC 어댑터의 둥근 끝부분을 드라이브에 연결합니다.
2 - 전원 코드를 AC 어댑터에 연결합니다.
3 - 전원 코드의 반대쪽 부분을 전원 콘센트에 연결합니다.
1 - AC
2 - AC
3 -
1 - AC
2 - AC
3 -
1
Connexion du câble USB
Anschließen des USB-Kabels
Conexión del cable USB
USB 케이블 연결
USB
USB
Connexion de l’adaptateur CA et branchement
Verbinden des Netzteils mit dem Laufwerk und einer Steckdose
Conexión del adaptador CA y conexión a una salida
AC
AC 어댑터 연결 및 콘센트에 연결
AC
Dell PN CT198 REV A00
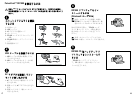
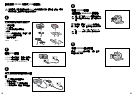
Install RD1000 Software
(For Windows
®
Users Only)
NOTE: To ensure proper operation and
feature support of the RD1000 device do
not skip this step.
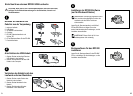
Insert “RD1000 User’s Guide & Utilities” CD and
follow instructions to complete installation before
first use.
NOTE: This step is not needed for Linux
operating systems.
1
2
3
4
Install Backup Software for RD1000
Insert the “Backup Software for RD1000” CD and
follow the instructions to complete installation.
5
Unpack unit and accessories
1
Setting Up Your PowerVault
™
RD1000
Connect the USB cable
2
Setting Up Your
PowerVault
™
RD1000
1
2
3
4
5 6
1
2
7
1 - Unité externe
2 - Câble USB
3 - Adaptateur CA et câble d’alimentation
4 - Cartouche
5 - DC « Guide de l’utilisateur et utilités RD1000
6 - DC « Logiciel de sauvegarde pour RD1000 »
7 - Guide d’information du produit
1 - externes Laufwerk
2 - USB-Kabel
3 - AC-Netzteil und Netzkabel
4 - Cartridge
5 - RD1000 „Benutzerhandbuch und Utilities”-CD
6 - CD mit Backupsoftware für das RD1000
7 - Produktinformation
1 - Unidad externa
2 - Cable USB
3 - Adaptador CA y cable
4 - Cartucho
5 - CD “Manual del usuario y utilidades de RD1000”
6 - CD de respaldo del Software de RD1000
7 - Manual de Información sobre el Producto
1 -
2 - USB
3 - AC
4 -
5 - RD1000 CD
6 - RD1000 CD
7 -
1 - 외부 장치
2 - USB 케이블
3 - AC 어댑터 및 전원 코드
4 - 카트리지
5 - RD1000 사용자 가이드 및 유틸리티 CD
6 - RD1000 CD용 백업 소프트웨어
7 - 제품 정보 가이드
1 -
2 - USB
3 - AC
4 -
5 - RD1000 CD
6 - RD1000 CD
7 -
ADVERTENCIA: Antes de realizar la instalación y poner a funcionar su unidad
de disco removible, siga las instrucciones de seguridad de su Manual de
Información. sobre el Producto.
1 - External unit
2 - USB cable
3 - AC adapter and power cord
4 - Cartridge
5 - RD1000 User’s Guide & Utilities CD
6 - Backup Software for RD1000 CD
7 - Product Information Guide
1 - Plug the square end of the USB cable into the drive.
2 - Plug the flat end of the USB cable into the computer.
1 - Connectez l’extrémité carrée du câble USB au lecteur.
2 - Connectez l’extrémité plate du câble USB à l’ordinateur.
1 - Stecken Sie das rechteckige Ende des USB-Kabels in das Laufwerk.
2 - Stecken Sie das flache Ende des USB-Kabels in den Computer.
1 - Conecte el extremo cuadrado del cable USB en la unidad.
2 - Conecte el extremo plano del cable USB en el computador.
1 - USB 케이블의 사각형 끝부분을 드라이브에 연결합니다.
2 - USB 케이블의 평평한 끝부분을 컴퓨터에 연결합니다.
1 - USB
2 - USB
1 - USB
2 - USB
CAUTION: Before you set up and operate your Dell™ removable disk drive,
follow the safety instructions in your Product Information Guide.
ATTENTION : Avant d’installer et d’utiliser le disque dur amovible Dell™,
veuillez lire les instructions de sécurité dans le Guide d’informations du
produit.
VORSICHT: Befolgen Sie vor dem Einrichten und dem Betrieb Ihres Dell™
Wechselplattenlaufwerks die Sicherheitshinweise in der Produktinformation.
Copyright text goes
Installation de RD1000 PowerVault™
Einrichtung Ihres PowerVault™ RD1000
Cómo ajustar su PowerVault™ RD1000
PowerVault™ RD1000 설정
PowerVault™ RD1000
PowerVault™ RD1000
Déballez l’unité et les accessoires
Nehmen Sie Laufwerk und Zubehör aus der Verpackung
Desempaque la unidad y los accesorios
장치 및 액세서리 포장 풀기
주의: Dell™ 이동식 디스크 드라이브를 설정 및 작동하기 전에 제품
정보 가이드에 있는 안전 지침을 준수하십시오.
: Dell™ ,
Dell™
Connect the AC adapter and plug into outlet
3
2
3
1 - Plug the rounded end of the AC adapter into the drive.
2 - Plug the power cord into the AC adapter.
3 - Plug the other end of the power cord into a power outlet.
1 - Branchez l’extrémité ronde de l’adaptateur CA dans le lecteur.
2 - Connectez le câble d’alimentation à l’adaptateur CA.
3 - Branchez l’autre extrémité du câble d’alimentation dans la prise de courant.
1 - Stecken Sie den runden Stecker des Netzteils in das Laufwerk.
2 - Stecken Sie das Netzkabel in das Netzteil.
3 - Stecken Sie die andere Seite des Netzkabels in eine Steckdose.
1 - Conecte el extremo redondo del adaptador AC en la unidad.
2 - Conecte el cable de alimentación al adaptador CA.
3 - Conecte el otro extremo del cable de alimentación a punto de
1 - AC 어댑터의 둥근 끝부분을 드라이브에 연결합니다.
2 - 전원 코드를 AC 어댑터에 연결합니다.
3 - 전원 코드의 반대쪽 부분을 전원 콘센트에 연결합니다.
1 - AC
2 - AC
3 -
1 - AC
2 - AC
3 -
1
Connexion du câble USB
Anschließen des USB-Kabels
Conexión del cable USB
USB 케이블 연결
USB
USB
Connexion de l’adaptateur CA et branchement
Verbinden des Netzteils mit dem Laufwerk und einer Steckdose
Conexión del adaptador CA y conexión a una salida
AC
AC 어댑터 연결 및 콘센트에 연결
AC
Dell PN CT198 REV A00
Setting Up Your RD1000 External USB Drive
CAUTION: Before you set up and operate your Dell™ removable disk drive, follow the
safety instructions in your Safety, Environmental and Regulatory Information guide.
Turn on the tape drive.
Get Started.
Regulatory and Safety Information. Installation and Configuration.
Press the power button on the
tape drive. The power indicator
should light up.
Refer to your host and application
software manuals to configure
the tape drive for use.
See the safety and regulatory notices in your .Product Information Guide See the for detailed information on the installation and
configuration of your tape drive.
User’s Guide
Copyright textgoes
Install RD1000 Software
(For Windows
®
Users Only)
4
Install Backup Software for RD1000
5
Dell PN CT198 REV A00
NOTE: To ensure proper operation and feature support of the RD1000 device do
not skip this step.
Insert “RD1000 User’s Guide & Utilities” CD and follow instructions to complete
installation before first use.
NOTE: This step is not needed for Linux operating systems.
REMARQUE: afin de garantir le bon fonctionnement et les fonctions de soutien
du RD1000, suivez scrupuleusement les instructions.
Insérez le DC « Guide de l’utilisateur et utilités RD1000 » et suivez les instructions
d’installation avant toute utilisation.
REMARQUE: Cette procédure n’est pas nécessaire pour les systèmes d’exploitation
Linux.
ANMERKUNG: Überspringen Sie diesen Schritt nicht, um die ordnungsgemäße
Funktion des Laufwerks und aller seiner Funktionen sicherzustellen.
Legen Sie die „Benutzerhandbuch und Utilities”-CD des RD1000 ein und folgen
Sie vor der ersten Inbetriebnahme den Anweisungen, um die Installation
abzuschließen.
ANMERKUNG: Dieser Schritt ist für Linux-Betriebssysteme nicht notwendig.
NOTA: Para garantizar una operación adecuada y el buen funcionamiento de
las características de apoyo del RD1000 siga las siguientes instrucciones.
Inserte el CD “Manual del usuario y utilidades de RD1000” y siga las instrucciones
de instalación antes de usar la unidad.
NOTA: Esta etapa no es necesaria para los sistemas operativos Linux.
참고: RD1000 장치를 올바르게 작동하고 지원되는 기능을 제대로
사용하려면 이 단계를 건너뛰지 마십시오.
장치를 처음으로 사용하는 경우 “RD1000 사용자 가이드 및 유틸리티
CD”를 넣고 지침을 따라 설치를 완료하십시오.
참고: Linux 운영 체제의 경우 이 단계를 수행할 필요가 없습니다.
Insert the “Backup Software for RD1000” CD and follow the
instructions to complete installation.
Insérez le DC « Logicielde sauvegarde pour RD1000 »et suivez
les instructions pour terminer l’installation.
Legen Sie die „Backupsoftware fürdas RD1000”-CD ein und befolgenSie die Anleitungen,
um die Installation abzuschließen.
“RD1000용 백업 소프트웨어” CD를 넣고 지침에 따라 설치를 완료하십
시오.
“RD1000 ” CD
RD1000 CD
Inserte el CD “Software de respaldo para RD1000” y siga las
instrucciones para terminar la instalación.
“Information in this document is subject to change without notice.
© 2009 Dell Inc. All rights reserved.
Trademarks used in this text: Dell and the DELL logo are trademarks of Dell Inc. Microsoft
and Windows are registered trademarks of Microsoft Corporation.
Other trademarks and trade names may be used in this document to refer to either the
entities claiming the marks and names or their products. Dell Inc. disclaims any proprietary
interest in trademarks and trade names other than its own.”
Installation du logiciel RD1000
(Pour les utilisateurs de Windows® seulement)
Installieren der RD1000-Software
(nur für Windows®-Nutzer)
Instalación del software RD1000
(Sólo para usuarios de Windows®)
RD1000 소프트웨어 설치
(Windows® 사용자만 해당)
RD1000
( Windows® )
RD1000
(Windows® )
Installation du logiciel de sauvegarde pour RD1000
Backupsoftware für das RD1000 installieren
Instalación del Software de respaldo para RD1000
RD1000용 백업 소프트웨어 설치
RD1000
RD1000 CD
L’information contenue dans ce document est sujette à modification sans avis préalable.
© 2009 Dell Inc. Tous droits réservés.
Les marques de commerce utilisées dans le présent texte, Dell et le logo DELL sont des
marques de commerce de Dell Inc. Microsoft et Windows sont des marques déposées de
Microsoft Corporation.
D’autres marques de commerce et appellations commerciales peuvent être utilisées dans
ce document pour se référer à des entités qui réclament les marques et appellations ou
leurs produits. Dell Inc. décline tout intérêt patrimonial pour les marques et appellations
commerciales autres que les siennes.
Die in diesem Dokument enthaltenen Informationen können ohne Vorankündigung geändert
werden.
© 2009 Dell Inc. Alle Rechte vorbehalten.
In diesem Text verwendete Warenzeichen: Dell und das DELL-Logo sind Warenzeichen
von Dell Inc. Microsoft und Windows sind eingetragene Warenzeichen der Microsoft
Corporation.
Andere in diesem Dokument möglicherweise verwendete Warenzeichen und
Handelsbezeichnungen sind unter Umständen Marken und Namen der entsprechenden
Firmen oder ihrer Produkte. Dell Inc. erhebt keinen Anspruch auf Warenzeichen oder
Handelsnamen mit Ausnahme ihrer eigenen.
La información de este documento puede cambiar sin previo aviso.
© 2009 Dell Inc. Reservados todos los derechos.
Marcas comerciales usadas en este texto: Dell y el logotipo de DELL son marcas
comerciales de Dell Inc. Microsoft y Windows son marcas comerciales registradas de
Microsoft Corporation.
Pueden utilizarse otras marcas y nombres comerciales en este documento para hacer
referencia a las entidades que reivindican las marcas y nombres o sus productos. Dell Inc.
renuncia a cualquier derecho de propiedad sobre marcas y nombres comerciales que no
sean los suyos.
이 문서의 내용은예고 없이변경될 수있습니다.
© 2006 DellInc. Allrights reserved.
이 문서에 사용된상표: Dell과 DELL 로고는Dell Inc.의 상표입니다.
Microsoft와 Windows는 MicrosoftCorporation의 등록상표입니다.
이 문서에서 상표와이름에 대한권리를 주장하는회사나 그회사의 제품을참조
하기 위해 그밖의 다른상표와 상호를사용할 수도있습니다. DellInc.는 자사
소유가 아닌 상표와상호에 대해어떠한 재산권도주장하지 않습니다.
Dell Inc.
Dell DELL Dell Inc. Microsoft
Windows Microsoft Corporation
Dell Inc.
© 2006 Dell Inc.All rights reserved.
Dell
Dell DELL Dell Inc.
Microsoft Windows MicrosoftCorporation
Dell
Setting Up Your
PowerVault
™
RD1000
RD1000
RD1000 & CD
Linux
RD1000
“RD1000 ” CD
Linux