


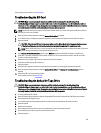


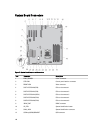


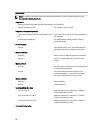


Item Connector Description
13 USB1 top/USB2/USB3 BOT USB connector
14 NIC1 TOP/NIC2 BOT NIC connector
15 COM TOP/VGA BOT Serial connector/video connector
16 INTRUSION Chassis intrusion switch connector
17 12V_2/P2 Power connector
18 12V_1/P3 Power connector
19 A1, A2, A3, A4, A5, A6 Memory module sockets
20 CPU1 Processor socket
21 FAN2 External cooling fan connector
22 BP_CONN Backplane connector
23 BATTERY System battery connector
24 INT USB Internal USB connector
25 FAN1 Internal cooling fan connector
26 PDB_I2C/P6 Power distribution board connector
27 ODD2/TBU SATA_F connector for optical disk drive 2 or SATA
tape backup unit
28 ODD1/TBU SATA_E connector for optical disk drive 1 or, tape
backup unit in software RAID-configured systems
29 SATA_A SATA connector
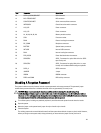
30 JUMPER Jumper
31 IDSDM IDSDM connector
32 PERC card CONN HDD activity connector
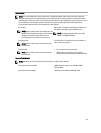
Disabling A Forgotten Password
The system's software security features include a system password and a setup password. The password jumper
enables these password features or disables them and clears any password(s) currently in use.
CAUTION: Many repairs may only be done by a certified service technician. You should only perform
troubleshooting and simple repairs as authorized in your product documentation, or as directed by the online or
telephone service and support team. Damage due to servicing that is not authorized by Dell is not covered by your
warranty. Read and follow the safety instructions that came with the product.
1. Turn off the system, including any attached peripherals, and disconnect the system from the electrical outlet.
2. Open the system.
3. Move the jumper on the system-board jumper from pins 2 and 4 to pins 4 and 6.
4. Close the system.
The existing passwords are not disabled (erased) until the system boots with the Jumper on pins 4 and 6. However,
before you assign a new system and/or setup password, you must move the jumper back to pins 2 and 4.
141