


CAUTION: To ensure proper system cooling, memory-module blanks must be installed in any memory socket that is
not occupied. Remove memory-module blanks only if you intend to install memory modules in those sockets.
1. Turn off the system, including any attached peripherals, and disconnect the system from the electrical outlet.
2. Open the system.
3. If applicable, remove the cooling shroud.
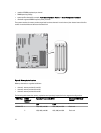
4. Locate the memory-module sockets.
CAUTION: Handle each memory module only by the card edges, making sure not to touch the middle of the
memory module or metallic contacts. To avoid damaging the memory module, handle only one memory
module at a time.
5. If a memory module or a memory-module blank is installed in the socket, remove it.
NOTE: Retain removed memory-module blank(s) for future use.
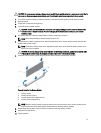
6. Align the memory-module's edge connector with the alignment key of the memory-module socket, and insert the
memory module in the socket.
NOTE: The memory-module socket has an alignment key that allows you to install the memory module in the
socket in only one orientation.
CAUTION: To prevent damage to the memory-module socket during installation, apply pressure at both ends
of the memory module evenly. Do not apply pressure to the center of the memory module.
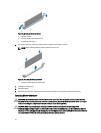
7. Press down on the memory module with your thumbs until the memory module snaps into place.
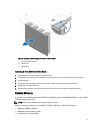
Figure 38. Installing The Memory Module
1. memory module
2. memory-module ejectors
3. memory-module socket alignment key
4. memory-module alignment key
NOTE: When the memory module is properly seated in the socket, the levers on the memory-module socket
align with the levers on the other identical sockets that have memory modules installed.
8. Repeat step 4 through step 7 of this procedure to install the remaining memory modules.
9. Replace the cooling shroud.
10. Close the system.
77