


3-2 Dell Dimension XPS H233 System Reference Guide
R
emoving the Computer Cover
Remove the computer cover on a desktop or mini tower
chassis as follows:
1. Observe the Warning for Your Personal Safety and
Protection of Your Equipment found earlier in this
chapter. Also, observe the safety instructions at
the front of this guide.
2. If you have a mini tower chassis, turn it on its
side.
NOTE: Place the chassis so that the foot hangs over
the edge of the work surface and allows the chassis
to lay flat.
3. Loosen the cover-mounting thumbscrew on the
back of the chassis.
NOTE: The cover-mounting thumbscrew is captive
and should be retained in the cover when loosened.
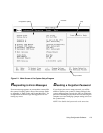
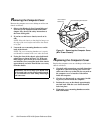
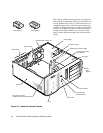
4. Facing the front of the chassis, place both hands
palms down as shown in Figure 3-1. With your
index fingers, press in the cover release latches,
and slide the cover toward the back of the chassis
approximately one inch. Then lift the cover away
from the chassis.
Figure 3-1. Removing the Computer Cover
(Mini Tower Chassis)
R
eplacing the Computer Cover
Replace the computer cover on a desktop or mini tower
chassis as follows:
1. Check all cable connections, especially those that
might have come loose during your work. Fold
cables out of the way so that they do not catch on
the computer cover or interfere with airflow
inside the computer.
2. Check to see that no tools or extra parts (includ-
ing screws) are left inside the computer.
3. Position the cover on the chassis approximately
one inch back. Slide the cover forward until it
locks into place.
4. Tighten the cover-mounting thumbscrew on the
back of the chassis.
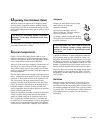
WARNING: Be sure to keep your hands clear
of the metal edges on the chassis and fan guard
as you slide the cover back. Sharp metal edges
can cause cuts.
cover-mounting thumbscrew
cover release
latches (2)
chassis foot